Saturday, December 6, 2008

Auto Start Applications at Login to GNOME Desktop

It may sound trivial, but for the longest time, I, being an avid CLI fan, did not configure GNOME to auto-start certain applications after login to desktop.

A couple of times, I actually went looking for some entry similar to Microsoft Windows Startup menu in the GNOME menu structures, but each time, I came up empty and frustrated.

Finally, I found out how, and I wrote it down. The following works for the GNOME Desktop 2.14.3 using the Debian Etch Linux distribution.

To configure GNOME to auto start an application on login,

  1. Mouse to Desktop -> Preferences -> Sessions.


  2. Click to select the Startup Programs Tab.
  3. Click Add.


  4. Enter the command, e.g., skype, and click OK.

    Note: You may need to enter the full path for the command, (e.g., /etc/bin/skype) if the command is not in the command path.
  5. Click Close to exit Sessions dialog box.

Saturday, November 29, 2008

How to increase number of disk mounts before next fsck at system boot

Many home users often power off their computers when they are not being used. Some do it to be green: turning idle computers off saves electricity and $$. Others do it for the extra security. To those who are hard-core Linux geeks, machine uptime is sacred, and voluntarily rebooting the machine is nothing but sacrilegious.

If you do reboot your machine from time to time, you most definitely have encountered a most annoying experience. Once in a while, while the computer is booting up, you see the message /dev/hdaN has reached maximal mount count, check forced. The check seems to take forever, and the system boot won't resume until the check is over.

The check refers to a file system check performed using the fsck command. For many Linux distributions, by default, the system will do a fsck check on a file system after it has been mounted 30 times, which means after 30 reboots. This is the maximum mount count before fsck is performed on the file system.

You can specify a maximum mount count for each individual partition on your hard drive. To find out the maximum mount count for /dev/hda1, execute this command as root:
$ tune2fs -l /dev/hda1 | grep 'Maximum mount count'
Maximum mount count: 30


Note that the tune2fs command is only applicable for ext2 and ext3 file systems.

The tune2fs command can also tell you how many times a file system has actually been mounted since the last fsck check.
$ tune2fs -l /dev/hda1 |grep 'Mount count'
Mount count: 17


To increase the maximum mount count, you will use the same tune2fs command but with the -c option.

Note that you should not modify the maximum mount count which is a file system parameter while the file system is mounted. The recommended way is to boot your system using a Linux Live CD, and then run tune2fs.

For me, I happened to have a Ubuntu 7.10 Live CD at my desk. I inserted the Live CD to boot up my system. Then, I opened a Terminal window, sudo -s, and executed the following commands.

First, I reminded myelf of how the /dev/hda disk is partitioned:
$ fdisk -l /dev/hda
Disk /dev/hda: 82.3 GB, 82348277760 bytes
255 heads, 63 sectors/track, 10011 cylinders
Units = cylinders of 16065 * 512 = 8225280 bytes

Device Boot Start End Blocks Id System
/dev/hda1 * 1 31 248976 83 Linux
/dev/hda2 32 10011 80164350 5 Extended
/dev/hda5 32 10011 80164318+ 8e Linux LVM


To increase the maximum mount count to 50 for /dev/hda1:
$ tune2fs -c 50 /dev/hda1
tune2fs 1.40.2 (12-Jul-2007)
Setting maximal mount count to 50


If there are more than 1 file system on your hard drive, you should stagger the maximum mount count for the different file systems so that they don't all trigger the lengthy fsck at the same time. For example, set the maximum mount count to 40, 50 and 60 for /dev/hda1, hda2, and hda3 respectively.

In the above case, /dev/hda5 is a physical LVM volume. You cannot run tune2fs on physical LVM volumes directly.
$ tune2fs -l /dev/hda5
tune2fs 1.40.2 (12-Jul-2007)
tune2fs: Bad magic number in super-block while trying to open /dev/hda5
Couldn't find valid filesystem superblock.


You need to run tune2fs against each logical LVM volume. To find out their names, cat /etc/fstab.
$ tune2fs -c 60 /dev/mapper/myhost-root 
tune2fs 1.40.2 (12-Jul-2007)
Setting maximal mount count to 60

Saturday, November 8, 2008

How to open and close the CD DVD tray

You can open/close the CD, DVD disk tray from the command line.

Many Linux users already know about the eject command for opening the disk tray:
 $ eject


How do you close the tray?

Turns out that you can use the same eject command but with an additional -t option to close the tray.

$ eject -t 


Before I found out about the -t option, I always had to reach and press the open/close button on the drive to close the tray. With the -t option, you can now both open and close the tray from the command line.

There is another option -T (CAPITAL T, that is) you should know.

eject -T
basically closes the tray if it is open, and opens the tray if it is closed.

The man page for eject has detailed explanation about the options.

Sunday, November 2, 2008

Two additional ways to tail a log file

I want to revisit a topic: how to tail a log file. My earlier posts discussed the use of tail and less commands to tail a log file, and multitail if you need to tail multiple files at once.

This followup article discussed two other ways to tail a log file: the use of the most command, and to tail within emacs.

The most command bills itself as a replacement for less. Like its predecessors less and more, most is a file pager program.

To install most on my Debian Etch system:
$ apt-get update && apt-get install most


To page the log file say /var/log/messages:
$ most /var/log/messages


This opens the log file, and displays the first page.

To tail the file, put most into Tail Mode by pressing the F key (capital F).

You should see the following line in the status area at the bottom of the tail window.
Most Tail Mode--  MOST keys are still active.


If a new line is appended to the log file, most will automatically reposition the file to the end and display the new line.

Note that you can scroll the file or do a search when you are in Tail Mode. For example, you can press the PageUp/PageDown, UpArrow/DownArrow keys to scroll the file. Also, you can press / to search forward or ? to search backward. However, when you press a key in Tail Mode, you break out of Tail mode in the sense that newly appended lines are not automatically displayed in the window. Yet, you can hit F again to re-enter Tail Mode, or simply use the DownArrow scroll key to scroll past the end of file to fetch the new lines.

To quit most, press the q key.

For my fellow emacs users out there, another way to tail a log file is to do it right within emacs.

You need the tail-file elisp function which is in the emacs-goodies-el package. Debian users can install this package like this:
$ apt-get update && apt-get install emacs-goodies.el


To tail a file in emacs: start emacs, hit M-x (Alt and x keys together), and type tail-file. Then, enter the filename to tail. The net result is that this will spawn an external tail -f process.

Note that you can't read the entire file under emacs using tail-file, only the tail initially and the newly appended lines portion afterwards.

Saturday, October 18, 2008

How to disable SSH host key checking

Remote login using the SSH protocol is a frequent activity in today's internet world. With the SSH protocol, the onus is on the SSH client to verify the identity of the host to which it is connecting. The host identify is established by its SSH host key. Typically, the host key is auto-created during initial SSH installation setup.

By default, the SSH client verifies the host key against a local file containing known, trustworthy machines. This provides protection against possible Man-In-The-Middle attacks. However, there are situations in which you want to bypass this verification step. This article explains how to disable host key checking using OpenSSH, a popular Free and Open-Source implementation of SSH.

When you login to a remote host for the first time, the remote host's host key is most likely unknown to the SSH client. The default behavior is to ask the user to confirm the fingerprint of the host key.
$ ssh peter@192.168.0.100
The authenticity of host '192.168.0.100 (192.168.0.100)' can't be established.
RSA key fingerprint is 3f:1b:f4:bd:c5:aa:c1:1f:bf:4e:2e:cf:53:fa:d8:59.
Are you sure you want to continue connecting (yes/no)?

If your answer is yes, the SSH client continues login, and stores the host key locally in the file ~/.ssh/known_hosts. You only need to validate the host key the first time around: in subsequent logins, you will not be prompted to confirm it again.

Yet, from time to time, when you try to remote login to the same host from the same origin, you may be refused with the following warning message:
$ ssh peter@192.168.0.100
@@@@@@@@@@@@@@@@@@@@@@@@@@@@@@@@@@@@@@@@@@@@@@@@@@@@@@@@@@@
@ WARNING: REMOTE HOST IDENTIFICATION HAS CHANGED! @
@@@@@@@@@@@@@@@@@@@@@@@@@@@@@@@@@@@@@@@@@@@@@@@@@@@@@@@@@@@
IT IS POSSIBLE THAT SOMEONE IS DOING SOMETHING NASTY!
Someone could be eavesdropping on you right now (man-in-the-middle attack)!
It is also possible that the RSA host key has just been changed.
The fingerprint for the RSA key sent by the remote host is
3f:1b:f4:bd:c5:aa:c1:1f:bf:4e:2e:cf:53:fa:d8:59.
Please contact your system administrator.
Add correct host key in /home/peter/.ssh/known_hosts to get rid of this message.
Offending key in /home/peter/.ssh/known_hosts:3
RSA host key for 192.168.0.100 has changed and you have requested strict checking.
Host key verification failed.$

There are multiple possible reasons why the remote host key changed. A Man-in-the-Middle attack is only one possible reason. Other possible reasons include:
  • OpenSSH was re-installed on the remote host but, for whatever reason, the original host key was not restored.
  • The remote host was replaced legitimately by another machine.

If you are sure that this is harmless, you can use either 1 of 2 methods below to trick openSSH to let you login. But be warned that you have become vulnerable to man-in-the-middle attacks.

The first method is to remove the remote host from the ~/.ssh/known_hosts file. Note that the warning message already tells you the line number in the known_hosts file that corresponds to the target remote host. The offending line in the above example is line 3("Offending key in /home/peter/.ssh/known_hosts:3")

You can use the following one liner to remove that one line (line 3) from the file.
$ sed -i 3d ~/.ssh/known_hosts

Note that with the above method, you will be prompted to confirm the host key fingerprint when you run ssh to login.

The second method uses two openSSH parameters:
  • StrictHostKeyCheckin, and

  • UserKnownHostsFile.

This method tricks SSH by configuring it to use an empty known_hosts file, and NOT to ask you to confirm the remote host identity key.
$ ssh -o UserKnownHostsFile=/dev/null -o StrictHostKeyChecking=no peter@192.168.0.100
Warning: Permanently added '192.168.0.100' (RSA) to the list of known hosts.
peter@192.168.0.100's password:

The UserKnownHostsFile parameter specifies the database file to use for storing the user host keys (default is ~/.ssh/known_hosts).

The /dev/null file is a special system device file that discards anything and everything written to it, and when used as the input file, returns End Of File immediately.

By configuring the null device file as the host key database, SSH is fooled into thinking that the SSH client has never connected to any SSH server before, and so will never run into a mismatched host key.

The parameter StrictHostKeyChecking specifies if SSH will automatically add new host keys to the host key database file. By setting it to no, the host key is automatically added, without user confirmation, for all first-time connection. Because of the null key database file, all connection is viewed as the first-time for any SSH server host. Therefore, the host key is automatically added to the host key database with no user confirmation. Writing the key to the /dev/null file discards the key and reports success.

Please refer to this excellent article about host keys and key checking.

By specifying the above 2 SSH options on the command line, you can bypass host key checking for that particular SSH login. If you want to bypass host key checking on a permanent basis, you need to specify those same options in the SSH configuration file.

You can edit the global SSH configuration file (/etc/ssh/ssh_config) if you want to make the changes permanent for all users.

If you want to target a particular user, modify the user-specific SSH configuration file (~/.ssh/config). The instructions below apply to both files.

Suppose you want to bypass key checking for a particular subnet (192.168.0.0/24).

Add the following lines to the beginning of the SSH configuration file.
Host 192.168.0.*
StrictHostKeyChecking no
UserKnownHostsFile=/dev/null

Note that the configuration file should have a line like Host * followed by one or more parameter-value pairs. Host *means that it will match any host. Essentially, the parameters following Host * are the general defaults. Because the first matched value for each SSH parameter is used, you want to add the host-specific or subnet-specific parameters to the beginning of the file.

As a final word of caution, unless you know what you are doing, it is probably best to bypass key checking on a case by case basis, rather than making blanket permanent changes to the SSH configuration files.

If you make it this far in the article, you may find the following more recent ssh articles interesting:

Allow root ssh login with public key authentication
How to auto fill in ssh client parameters
One-liner to shutdown remote host
X11 Forwarding over SSH

Saturday, September 27, 2008

Upgrade individual packages for Debian-based systems

If you are using Debian-based distributions (Debian, Ubuntu, etc), you are probably familiar with the apt-get update followed by the apt-get upgrade routine. That is what I regularly use to upgrade ALL packages that have an update available.

But what if you only want to upgrade certain individual packages?

apt-get upgrade will upgrade ALL or nothing. So, that is out of the question.

What you need is apt-get install. apt-get install serves dual purposes: install and upgrade. It installs a package if it is not already installed. If it is already installed, apt-get install will upgrade the package to the latest version.

You should still run apt-get update before apt-get install. You can specify one or more package names as arguments to the apt-get install command.

For example, to upgrade these 2 packages: libfreetype6, libtiff4:
$ sudo apt-get update
$ sudo apt-get install libfreetype6 libtiff4

Sunday, September 21, 2008

How to get the process start date and time

How can we determine when a running process was started?

The venerable ps command deserves first consideration.

Most Linux command-line users are familiar with either the standard UNIX notation or the BSD notation when it comes to specifying ps options.

If ps -ef is what you use, that is the UNIX notation.

$ ps -ef
UID PID PPID C STIME TTY TIME CMD
root 1 0 0 Sep20 ? 00:00:03 init [3]

peter 1218 1 0 Sep20 ? 00:21:35 /usr/lib/iceweasel/firefox-bin -a firefox

peter 4901 1 1 16:34 ? 00:01:12 /usr/bin/emacs-snapshot-gtk


The STIME column displays the start time or date. From the above, we can tell that process 4901 (emacs) began execution at 16:34 (4:34 pm). But on what day, today?

From the ps man page: 'Only the year will be displayed if the process was not started the same year ps was invoked, or "mmmdd" if it was not started the same day, or "HH:MM" otherwise.'

So, emacs was started at 16:34 TODAY.

What is the start time for the other process, the firefox process with pid 1218?

The STIME for process 1218 reads Sep20 (which was yesterday). But what time yesterday?

The default ps -ef only tells you the start date but NOT the time if a process was NOT started on the same day.

If the BSD notation is more familiar to you, you will find that ps aux yields similar results.

$ ps aux
USER PID %CPU %MEM VSZ RSS TTY STAT START TIME COMMAND
root 1 0.0 0.1 1576 540 ? Ss Sep20 0:03 init[3]

peter 1218 0.5 8.9 201252 45456 ? Sl Sep20 21:35 /usr/lib/iceweasel/firefox-bin -a firefox


The Start column in the above output only reveals the start date if the process is older than the current day.

There are (at least) 2 ways to determine the exact start time if the process was started before the current day.

Solution 1
Specify elapsed time in the ps output format.

$ ps -eo pid,cmd,etime
PID CMD ELAPSED
1218 /usr/lib/iceweasel/firefox-bin - 2-16:04:45


The above ps command specifies 3 fields to be included in the output: the process pid, the command, and the elapsed time, respectively.

etime is the elapsed time since the process was started, in the form dd-hh:mm:ss. dd is the number of days; hh, the number of hours; mm, the number of minutes; ss, the number of seconds.

The firefox command started execution 2 days, 16 hours, 4 minutes and 45 seconds ago. To find the exact time, you need to do some simple math.

If you prefer the BSD notation, issue this command:
$ ps axo pid,cmd,etime
PID CMD ELAPSED

1218 /usr/lib/iceweasel/firefox-bin - 2-16:04:57


Solution 2
Get the process pid and read off the timestamp in the corresponding subdirectory in /proc.

First, get the process pid using the ps command (ps -ef or ps aux)

Then, use the ls command to display the creation timestamp of the directory.
$ ls -ld /proc/1218
dr-xr-xr-x 5 peter peter 0 Sep 20 16:14 /proc/1218


You can tell from the timestamp that the process 1218 began executing on Sept 20, 16:14.

If you can think of another clever way to get the start time and date, please let us know.

Tuesday, September 2, 2008

How to find and delete all hard links to a file

Deleting a file is deceptively simple. You can simply use the rm command like this.
$ rm file1


However, if the file has one or more hard links to it, life gets more interesting. You need to seek and destroy all hard links to the file.

A hard link is essentially another name for a file. Hard links to file1 can be created as follows:
$ ln file1 file2
$ ln file1 tmp/file3


file2 and file3 become another name of file1.

How do I know if some file has a hard link to it?

Do a long listing of the file like this.
$ ls -l file1
-rw-r--r-- 3 peter peter 0 2008-09-01 16:15 file1


Note that the hard link count has the value 3 (this is the number to the left of the file owner). It means that the physical file has 3 names: file1 and two others.

If you only rm file1, the other 2 names still exist, and users can still access the physical file using these 2 names.

To find out all hard links to file1, use this command.
$ find /home -xdev -samefile file1
/home/peter/file1
/home/peter/tmp/file3
/home/peter/file2


Note that we specified /home as the search starting point. You should replace /home with the mount point for the filesystem in which your file1 was created. (This is likely to be either /home or / for files in your home directory.)

The reason for using the filesystem's mount point is that hard links are restricted to reside in the same filesystem as the physical file. This means that file2 and file3 must be in the same filesystem as file1. Therefore, to find ALL hard links to a file, you must start search at the mount point of the filesystem.

The -xdev option instructs find NOT to traverse directories in other filesystems.

To find and delete all hard links to a file:
$ find /home -xdev -samefile file1 | xargs rm


An alternative (and slightly more complicated) method is by using inodes. An inode is a data structure assigned to a physical file that contains all its meta-information except the file's name(s).

All hard links to a physical file share the same inode, and have the same inode id number. Therefore, if you know the inode number of a file, you can find all hard links to the file by searching for files with the same inode number.

To display a file's inode number, use ls -i:

$ ls -li file1
2655341 -rw-r--r-- 3 peter peter 0 2008-09-02 19:09 file1


The first column in the above listing shows the file's inode number.

Now that you know the inode number of file1, you can use the find command to search for all files that have the same inode number:

$ find /home -xdev -inum 2655341
/home/peter/file1
/home/peter/tmp/file3
/home/peter/file2


To delete all hard links to the physical file:
$ find /home -xdev -inum 2655341 | xargs rm 

Sunday, August 17, 2008

How I repaired a corrupted grub menu.lst config file

Imagine the shock when I discovered my Debian Etch machine would not boot after I ran a "routine" apt-get upgrade. The upgrade involved quite a number of packages, including the kernel image.

GRUB, the default boot loader, came to an abrupt stop with the error message
Error 15: File Not found.

The culprit was the file / [01;31mvmlinuz- [00m2.6.18-6-k7.

The weird-looking file name suggested strongly that the GRUB config file, /boot/grub/menu.lst, got corrupted by the upgrade.

At this point, I had the following options:
  • Use a rescue CD/DVD like Knoppix to boot into the system, correct the menu.lst file, and reboot.

  • While in GRUB, repair the corrupted pre-set GRUB commands, boot up the system, then correct the menu.lst file, and reboot.

I chose the second option. Below was my experience, followed by some suggestions based on the hard lessons I learned.

I rebooted the system. At the GRUB menu, I selected the corrupted OS entry, and typed e to edit this entry's associated pre-set boot commands. (Note that the OS entries and their associated commands are taken from the menu.lst file.)

The boot commands associated with the OS entry were:
root  (hd0,0)
kernel / [01;31mvmlinuz- [00m2.6.18-6-k7 root=/dev/mapper/tiger-root ro
savedefault

That did not look right because of the funny looking characters in the kernel command and the fact that the boot commands from before were root, kernel, and initrd, but NOT savedefault.

ROOT

The root command specifies and mounts GRUB's root drive and partition where the boot directory is located (/boot). This is usually (hd0,0) which means the first partition of the first hard disk. Note, GRUB's notation for numbering drives and partitions starts from 0, not 1.

If you are not sure what to set the root drive, enter the GRUB batch command mode by pressing b, and enter the following find command.
grub> find /grub/stage1
(hd0,0)

The find command searches for the file named grub/stage1 and displays the root drive and partition which contains the file. Note that if the drive does not have a partition designated for /boot, you need to prepend /boot to the command argument (find /boot/grub/stage1)

So far so good: I did not have to modify the root drive.

KERNEL

The kernel command specifies and loads the Linux kernel image. The default image file name was corrupted. To correct, I selected the kernel command, and pressed e to edit the line.

What should the file name be? Different Linux distributions name the kernel image file differently. Don't fret if you can't remember its name. The GRUB command line offers file name completion. So just enter kernel / and then hit tab.
grub> kernel /
Possible files are: System.map-2.6.18-6-k7 config-2.6.18-5-k7 config-2.6.18-6-k7 initrd.img-2.6.18-5-k7 vmlinuz-2.6.18-5-k7 grub initrd.img-2.6.18-6-k7 System.map-2.6.18-5-k7 vmlinuz-2.6.18-6-k7

For Debian, Ubuntu, Fedora, and Mandriva, the kernel image file is named vmlinuz followed by the kernel release number and the machine architecture (e.g., vmlinuz-2.6.18-6-k7). From the options returned by the file name completion feature, choose the kernel image with the latest release number.

The rest of the kernel parameters looked OK, and required no change.
grub> kernel /vmlinuz-2.6.18-6-k7 root=/dev/mapper/tiger-root ro

INITRD

Next, I had to replace the savedefault command with the initrd command.

initrd specifies the ramdisk image file. The RAM disk is used for loading modules required to access the root filesystem.

I first selected the savedefault command and pressed e to edit the line. Again, you could use the Tab key to help you complete the filename for the RAM disk file.
grub> initrd   /initrd.img-2.6.18-6-k7 


Boot & Edit menu.lst

After I made the above changes, I went back to the GRUB main menu, and pressed b to boot.

This time, the machine booted up successfully, and everything worked just fine for me.

I was not done however. Unless I changed the source of the problem (the corrupted menu.lst), the machine would come up with the same boot error in the next reboot. So, as root, I opened the file /boot/grub/menu.lst and edited the commands.

Before I could modify the corrupted commands, I needed to first locate the corresponding OS entry in the file. Each OS entry occupies a separate section in the file, beginning with its own title line. So, I scrolled down the file until I reached the target title line.
title Debian GNU/Linux, kernel  [01;31m- [00m2.6.18-6-k7
root (hd0,0)
kernel / [01;31mvmlinuz- [00m2.6.18-6-k7 root=/dev/mapper/tiger-root ro
savedefault


After correcting the commands, save the file, and reboot the machine.

Lessons Learned

The GRUB config file (menu.lst) can get corrupted, and when it does, it spells real trouble.

The commands to boot the OS are not something anyone tends to remember. So, it makes sense to have a print out of the menu.lst file or a backup copy.

What I do is backup the menu.lst file in the same directory as menu.lst (say, call it menu.lst.bak).

The advantage of saving it in the same directory (as opposed to somewhere over the network) is that if the menu.lst file ever gets corrupted again, you can still display the backup copy at the grub command prompt. During the GRUB boot up process, you can display the backup file by simply entering the following at the GRUB command prompt.
 grub> cat /grub/menu.lst.bak 


The above cat command displays the backup menu.lst file. Armed with the knowledge of the correct commands to use, you can then edit the commands as shown in this article.

Saturday, August 9, 2008

How to show apt log history

Users of Debian-based distributions (myself included) often brag about Debian's supposedly superior package management tool-set. This tool-set includes a choice of several excellent package managers such as dpkg, apt, synaptic, and aptitude. The various tools are all first class at what they are designed to do.

In my opinion, one major feature gap is a command-line interface for viewing the apt change log. After a recent routine Etch package upgrade, I discovered that the grub menu.lst file got corrupted. So, I wanted to check the recent apt activities to find out which packages were the possible suspects.

A google search revealed that viewing change history is not that simple. Aptitude writes change log info to /var/log/aptitude. Synaptic users can get the same info through its graphical user interface. But is there a standard change log file that the most common Debian package managers write to? The second question is whether there exists a command-line tool for accessing it.

It turns out that such a log exists, and it is /var/log/dpkg.log. This is a single log file that records all the apt activities, such as installs or upgrades, for the various package managers (dpkg, apt-get, synaptic, aptitude).

Regarding a command-line tool for accessing apt history, there used to be a package named apt-history for viewing apt-get activities. Its web site suggests that work in the project has been discontinued due to the fact that dpkg now does logging. It went on to recommend the use of a simple bash function (also named apt-history) to access the log file (/var/log/dpkg.log)

Below is the bash function from that web site.
function apt-history(){
case "$1" in
install)
cat /var/log/dpkg.log | grep 'install '
;;
upgrade|remove)
cat /var/log/dpkg.log | grep $1
;;
rollback)
cat /var/log/dpkg.log | grep upgrade | \
grep "$2" -A10000000 | \
grep "$3" -B10000000 | \
awk '{print $4"="$5}'
;;
*)
cat /var/log/dpkg.log
;;
esac
}


I've tried it, and it works.

To set it up, insert the above code into /root/.bashrc.

To run apt-history, you need to become root (for example, sudo -i). Entering apt-history with no parameter will simply dump the change log file. To select what activities you want to see, you can enter one of install, upgrade, remove, rollback as a single parameter to apt-history.

$ sudo -i
Password:
# apt-history install
2008-08-01 21:37:00 install googlizer 0.3-3
2008-08-09 08:20:54 install agrep 4.17-3
2008-08-09 08:28:26 install abuse-frabs 2.10-7
2008-08-09 08:28:27 install abuse 1:0.7.0-5
#

Monday, August 4, 2008

Learn more about a command when no man info page is available

To read the documentation about a command, the first thing we do is to read its manual (man) page.
$ man cd
No manual entry for cd


But what if no man page is available for that command?

This could be due to a number of different reasons. For example, the Linux system was originally installed without any man pages at all. I worked with a Linux-based mobile gateway device that has 0 man pages pre-installed. This is to save disk space on a 1 GB Solid State Drive (SSD). In most typical desktops or servers, man pages are pre-installed.

A man page can be missing for a particular command because the administrator, for whatever reason, did not install the man page for that command. If that is the case, google is your best friend. The challenge here is to narrow down the search to get to the man page quickly.

There is yet another reason why there is no man page for a command. If it is a bash shell built-in command, it will NOT have its own man page. Documentation is still available but it is a bit harder to get to it. It turns out that information about bash built-in commands can be found inside the bash man page. You simply enter man bash, and search for the SHELL BUILTIN COMMANDS section (using the command /^SHELL BUILTIN). Then scroll down until you reach the built-in command you are looking for.

$ man bash


How do you know if something is a bash built-in command in the first place?

Use the type command (another bash built-in).

$ type cd
cd is a shell builtin


Note that not all Linux distributions behave the same way when you man a bash built-in command. Debian Etch, the distro I use at home, reports no man page when you man cd. Some distributions, like the Red Hat-based Centos, will display the bash man page. In this case, you are one step ahead of the rest.

Wednesday, July 30, 2008

Pondus: A personal weight management software


A week after my return from a New England & Canada cruise, I found myself busy searching for a personal weight management software.

Why weight management? See the chocolate dessert buffet pictures taken on board the Holland America Maasdam cruise ship.

I came across pondus, a python program that is free and open-sourced.

Pondus has a rather modest feature set: the ability to enter one's weight over time, and have it plotted in a chart. It does not have too many bells and whistles, but it is very simple to use.

Pondus is packaged with certain Debian releases (namely, Lenny and Sid). So a simple apt-get install pondus will put it on your system. Because I run Debian Etch, I need to install it from source files.

I downloaded the source tar ball as well as the install instructions from here. The instructions are straight-forward, and I installed pondus without a glitch.

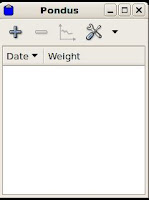
To run pondus, just type pondus in the command line. When you run pondus for the first time, it is not too terribly exciting .... because you have not entered any weight data.

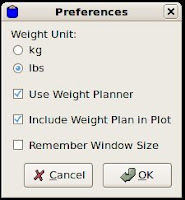
Before you enter your weight, you should customize the unit of measure that pondus will use(lbs versus kgs). Click on the Tool icon (the one with the screwdriver and wrench) to bring up Preferences. For me, I prefer pounds (that is the unit my scale uses).

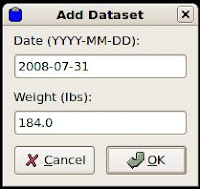
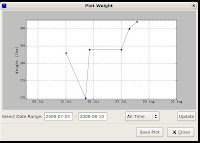
Now, let's enter some weight data, and draw a pretty chart.

To enter a weight, click on the Plus icon.

To plot the data, click on the Chart icon.

Pondus has some additional useful features such as data import and export in CSV format, as well as the ability to save the chart in png or svg (2-dimensional vector graphics) format.

An interesting feature is that you can set time-sensitive goals (aka, Weight Planner). For example, you can set a goal such as "weigh 180 lbs on August 15". This feature is disabled by default. To enable it, bring up Preferences as above, and click Use Weight Planner checkbox to select it, and choose whether to include the weight plan in your plots. Note that this feature is not for everyone (do I really need yet another remainder of my shortcomings?)

Pondus is adequate for tracking my body weight. I'm still searching for software that can also track my blood pressure. Won't it be perfect if a single software can manage both weight and blood pressure?

Monday, July 28, 2008

How to do reverse DNS lookup

Most people can better remember domain names, e.g., www.gnu.org, than their corresponding IP addresses, 199.232.41.10. (In this example, www.gnu.org is the home of the Free Software Foundation.) We delegate the responsibility to machines, aka, the DNS servers, to resolve the domain names for us.

Sometimes, we do need to manually lookup the IP address of a domain name. You may already be familiar with the nslookup command which is now deprecated. We use the dig command to make DNS queries.
 $ dig +noall +answer www.gnu.org
www.gnu.org. 67 IN CNAME gnu.org.
gnu.org. 67 IN A 199.232.41.10


The IP address is displayed in the A record, and is 199.232.41.10.

The +noall, +answer combination basically tells dig to only report the answer of the DNS query and skip the rest of the output.

You can also use the dig command with the -x option to do a reverse DNS lookup. A reverse DNS lookup means you want to look up the domain and host name of an IP address.

 $ dig +noall +answer -x 199.232.41.10
10.41.232.199.in-addr.arpa. 36000 IN CNAME rev-c41-10.gnu.org.
rev-c41-10.gnu.org. 300 IN PTR www.gnu.org.


The PTR record is the one that contains the domain host name. The domain name is, as you expect, www.gnu.org.

Note that PTR records are not required for IP addresses. If a PTR record is not defined for an IP address, you cannot do a remote DNS lookup.

Friday, July 18, 2008

How to count number of files in a directory

Now that I am back from vacation, I had to take care of some chores, like uploading the pictures taken with my digital camera.

I stepped out during the long upload process (400+ pictures). When I returned, it was already done. To just make sure all pictures are now on the server, I wanted to count the number of files in the targetdir directory.

$ ls -1 targetdir | wc -l
454

The above command reads ls dash one piped to wc dash letter l.

Note that if you had used ls dash letter l instead, the count is one greater than the actual number of files. This is because ls dash letter l outputs an extra total line:

$ ls -1 targetdir 
total 529436
-rw-r--r-- 1 peter peter  1510976 Jul 13  2008 DSCN1001.jpg
....

The above method will count symbolic links as well as subdirectories in targetdir (but not recursively into subdirectories).

If you want to exclude subdirectories, you need a heavier duty tool than ls.

$ find targetdir -maxdepth 1 -type f | wc -l

-type f ensures that the find command only returns regular files for counting (no subdirectories).

By default, the find command traverses into subdirectories for searching. -maxdepth 1 prevents find from traversing into subdirectories. If you do want to count files in the subdirectories, just remove -maxdepth 1 from the command line.

Note that the find command does NOT classify a symbolic link as a regular file. Therefore, the above find -type f command does not return symbolic links. As a result, the final count excludes all symbolic links.

To include symbolic links, add the -follow option to find.

$ find targetdir -follow  -maxdepth 1 -type f | wc -l 

Saturday, June 21, 2008

Dual pane Linux file managers: mc and emelfm

I have been computing all my life without using a dual pane file manager until one day I decided that having one will greatly enhance my qualify of life. What I had in mind was something that will make my life easier in the copying or moving of files from 1 directory to another.

By dual pane (or twin-pane) file manager, I mean a file manager that displays two directories side by side (one active, one passive). The term is confusing because often a dual pane file manager has a third pane that lets you enter commands to execute on the active directory.

Staying true to my preference for Command Line Interface (CLI), I first tried Midnight Commander (mc). As advertised, mc is a file manager that is loaded with features. What I am looking for though is modest: a file manager with 2 directory panes that will satisfy my very basic day-to-day file management needs.


I found myself customizing the look and feel of mc in the early adoption stage. The nostalgic white text on blue background had to go.

You can run mc with the -b option to force black and white.
$ mc -b

If you don't want to go that far, you can customize the color used by editing the init file (~/.mc/ini).

I inserted the following lines into the ~/.mc/ini file.

[Colors]
base_color=lightgray,green:normal=green,default:selected=white,gray:marked=yellow,default:markselect=yellow,gray:directory=blue,default:executable=brightgreen,default:link=cyan,default:device=brightmagenta,default:special=lightgray,default:errors=red,default:reverse=green,default:gauge=green,default:input=white,gray:dnormal=green,gray:dfocus=brightgreen,gray:dhotnormal=cyan,gray:dhotfocus=brightcyan,gray:menu=green,default:menuhot=cyan,default:menusel=green,gray:menuhotsel=cyan,default:helpnormal=cyan,default:editnormal=green,default:editbold=blue,default:editmarked=gray,blue:stalelink=red,default


I also rearranged the panes so that they are placed horizontally (instead of vertically). You can interactively customize the placement using the mc Options menu (when you are already in mc). Alternatively, you can edit the ~/.mc/ini file, and make sure that the following horizontal_split line appears in the [Midnight-Commander] section:
[Midnight-Commander]
....
horizontal_split=1


My mc window looked like this after the above customization.


Another major annoyance is that if you run mc in a Gnome window, you cannot use the F10 key to quit mc. It turns out that F10 is normally the key to access the menu-bar in Gnome. To quit mc, you use your mouse to click the Quit soft-key.

If it bothers you as much as it bothered me, you might want to disable the standard F10 menu-bar shortcut key for Gnome. To do that:
$ gconftool-2 --set /apps/gnome-terminal/global/use_menu_accelerators --type bool false

After giving it a good run for about 3 weeks, I gave up on mc. The determining factor was how mc handles the Tab key.

Like other dual pane file managers, mc has a third pane that acts as the command line input window. However, the type of commands that will run in that window seems very limited. I tried commands such as date, pwd, ls, but they all showed no output. The most annoying feature to me is the Tab key. I am used to tapping the Tab key in a bash window for command completion. If you hit Tab while you are typing away in the mc's command line window, the effect is that mc switches the active focus to the other pane.

I won't be surprised if someone tells me there is a way to customize the handling of the Tab key. But, at that point in time, I concluded that I will look for some other file manager that requires less adjustment and customization.

I first became aware of emelfm because it is packaged with the Damn Small Linux (DSL) distribution. I decided to take a look at it because if it is included in DSL, it should be simple enough to satisfy my modest needs.

emelfm is a GUI-based double pane file manager. It has a clean, simple, and intuitive UI. It does the basic file copying and moving. It also has some nice additional features such as the ability to set bookmarks and apply filters to filenames.

One minor annoyance I find is when I try to copy a file in the active window to the same location. Essentially, what I want to do is copy and paste a file (to a new name) in the same directory in the active pane. I cannot use the Copy button to do it because it will only copy the file to the other pane. Instead, I need to enter the cp command explicitly in emelfm's command line window to do the copy.

[P. Evans pointed out that emelfm has a Clone plugin that copies a file to the same directory. Click Configure and then Buttons. Add a button and select the Clone plugin.]

Using the command line window in emelfm turns out to be a pleasant experience (as compared to mc). Hitting the Tab key will only switch the active pane if your mouse cursor is not in the command line window. If the cursor is in the command line window, hitting the Tab key does what I expect: command and filename completion. The commands that did not work in mc all worked well in emelfm (date, pwd, ls).

I have been happily using emelfm since then. There are other GUI-based dual pane file managers out there: e.g., Krusader, Double Commander. I have not tried them. However, I do most file management on the CLI, and only occasionally use a GUI-based file manager to do file copying. As such, emelfm satisfies my requirement for a GUI-based file manager.

Friday, June 20, 2008

Run emacs in batch mode to byte-compile elisp files

emacs is my favorite text editor. (No flame please.)

Little known and used perhaps is the fact that emacs does run in batch mode. By batch, I mean emacs accepts and executes commands in the command line, without any user interaction.

You can emulate a typical emacs text editing session as follow:
$ emacs -batch afile.txt -l runme.el -f save-buffer -kill

This command opens the afile.txt in batch emacs mode.

The -l parameter specifies an elisp file to load and execute. In this example, it loads the elisp file named runme.el which modifies the file buffer.

Next, it saves the buffer. Note that the -f parameter tells emacs to run a command, save-buffer in this case.

Finally, the -kill tells emacs to exit.

Below, I run emacs in batch to byte-compile a list of source elisp files. This comes in handy if you have a lot of source elisp files to compile.

$ emacs -batch -l runme.el -kill

Note that I do not need to save the buffer. Hence, no save-buffer.

The output byte-code files (.elc) will be put in the same directory as the source elisp files.

The runme.el file contains the commands to byte-compile the source elisp files.
$ cat runme.el
(byte-compile-file "/home/peter/emacs/mods/log4j-mode.el")
(byte-compile-file "/home/peter/emacs/mods/vm-w3m.el")

Wednesday, June 18, 2008

Create File of a Given Size ... with random contents

A while back, I wrote about how to create a zero-filled file of any arbitrary size. This is part 2 where I share how to create a file of random contents (not just zeroes).

Recently, I ran into a situation where a zero-filled file is insufficient. I needed to create a log file of size 2 MB in order to be zipped up and copied to another server.

To create the 2MB file (with all zeroes), I run the dd command:
$ dd if=/dev/zero of=a.log bs=1M count=2

I quickly realized that the test result would be invalid because zipping a all-zero file dramatically reduced its size.

$ gzip a.log
$ ls -hl a.log*
-rw-r--r-- 1 peter peter 2.1K 2008-06-14 14:36 a.log.gz
$


I decided to create a 2 MB file of random contents instead. This is how.

$ dd if=/dev/urandom of=a.log bs=1M count=2
2+0 records in
2+0 records out
2097152 bytes (2.1 MB) copied, 1.00043 seconds, 2.1 MB/s
$ gzip a.log
$ ls -hl a.log*
-rw-r--r-- 1 peter peter 2.1M 2008-06-14 14:43 a.log.gz
$


To take a look at the random contents of a.log, use the hexdump command:

$ hexdump a.log |head
0000000 c909 2da7 4a77 22fc 88b6 b394 be42 b0c1
0000010 1531 f9d5 4b3d 390d e670 da2c e7e9 b681
0000020 0518 2b5d 5a66 ef76 c297 7f73 2d0b 453e
0000030 ba47 c268 26f9 79b5 1816 82ac 2e76 0ff2
0000040 c1e8 e14f 898f 2507 9c29 83b7 226c 0d65
0000050 f3f6 6eb4 62d9 410b b566 c522 ffca fbac
0000060 81f6 d91c dd34 18cd f873 8073 fa02 20c1
0000070 06bb 7e32 dc2e 13b2 a345 aadd 8700 fa9e
0000080 e28e 1b58 c25f 4619 c8bc 8110 6306 a2fc
0000090 9766 d98f 648e cec7 d654 2eaa 1f6f 839f

Monday, June 16, 2008

Smart case-insensitive, incremental search using vim

My previous article describes my top annoyance with the vim text editor, namely, its syntax highlighting. In this article, I will tell on a close second annoyance, and what to do about it.

vim, by default, searches case sensitively. If you search for apple, you will find exactly that, but not Apple or APPLE.

In most situations, I want my searches to be case insensitive. To make search case sensitive, set the corresponding vim option by typing :set ignorecase (and press the return key).

ignorecase has a shorter alias called ic. You can type :set ic and it will have the same effect.

Now searching for apple will give you Apple, APPLE as well as apple.

But, what about the situations where you DO want case-sensitive searching?

You can always disable the ignorecase search, by typing the following and hit return:
:set noignorecase

Flipping between ignorecase and ignorecase can be tiresome for even the most patient. Luckily, vim has the smartcase option that you can use TOGETHER with ignorecase.

Type the following:
:set ignorecase (and hit return)
:set smartcase (and hit return)


With both ignorecase and smartcase turned on, a search is case-insensitive if you enter the search string in ALL lower case. For example, searching for apple will find Apple and APPLE.

However, if your search string has one or more characters in upper case, it will assume that you want a case-sensitive search. So, searching for Apple will only give you Apple but not apple or APPLE. It turns out to be quite satisfactory for most people (including yours truly).

While we are on the topic of vim search options, there is a third option that you should know:
:set incsearch (and hit return)

incsearch stands for incremental search. It means that you will see what vim matches as you type in each letter of your search string (without having to hit return before search is even attempted).

For example, you type / to initiate search, and right after you type the letter a, vim will highlight the a in apple. As you type the next letter p, vim will highlight ap in the word apple.

You can often find what you are looking for before you finish typing in the entire search string. It is also helpful if you are not quite sure of what you are searching for, and depending on the instant feedback as you type, you can make corrections to the search string by backspacing.

If you want to enable those options permanently, insert the following lines into your ~/.vimrc file.
set ignorecase
set smartcase
set incsearch


Happy searching!

Saturday, June 7, 2008

How to find a file and cd to its dirname using command substitution

Many times I know the name of a file on my Linux machine, say unknown.txt, but I don't know the directory the file is in.

If I want to change directory to the directory folding the file, I used to do a 2-step process:
$ find / -name unknownfile.txt 2>/dev/null
/home/peter/status/2007/november/unknownfile.txt


Note: if you know more about where that file may be, you can always make the starting point of the find more specific (say "/home/peter" instead of just "/").

Then, I manually enter the cd command with the path discovered from the last step.
$ cd /home/peter/status/2007/november
$


I got tired of re-entering the directory name in this 2 step process. So, I set out to see if I can automate it further.

Here we go.

There may be more than 1 file of that file name, and if so, let's take the first one.

$ find / -name unknownfile.txt  2>/dev/null | head -n 1
/home/peter/status/2007/november/unknownfile.txt


We need to extract just the directory path, and leave out the filename (so that we can cd to the directory).

The dirname command should be able to do that, but alas, dirname cannot take its input from STDIN. dirname expects the file name as a command line parameter. The following will fail.
$ find / -name unknownfile.txt  2>/dev/null | head -n 1  | dirname
dirname: missing operand
Try `dirname --help' for more information.


This is where command substitution comes in.

The final command is:
$ cd $(dirname $(find / -name unknownfile.txt  2>/dev/null | head -n 1))
$ pwd
/home/peter/status/2007/november
$


Let's break it down. Using command substitution, the output of one command becomes the input parameter to another command.

The first command substitution we use is:
dirname $(find / -name unknownfile.txt  2>/dev/null | head -n 1)


In this case, the output of "find / -name unknownfile.txt 2>/dev/null | head -n 1" becomes the input to dirname.

Then, we again use command substitution to make available the output of dirname as the input to cd.

cd $(dirname $(find / -name unknownfile.txt  2>/dev/null | head -n 1))

Thursday, June 5, 2008

Show progress during dd copy

(2016-01-09 Update)
I owe RapidElectronic for his excellent comment regarding the new dd command. Beginning with version 8.24, you can specify the parameter, status=progress, to the dd command. By using this new parameter, you no longer need to send an explicit USR1 signal to the dd process to request an update of the disk copy statistics; it will automatically print periodic updates in the standard output.


$ sudo df if=/dev/sda of=/dev/sdb status=progress

Note that sending the USR1 signal will continue to work for the new dd.

(Original article)

dd is a popular, generic command-line tool for copying files from 1 location to another. It is often used to copy entire disk images.

Like many Linux command line tools, it operates silently unless something unexpected happens. Its lack of visual progress feedback is a nice feature for scripting. However, it can leave you wondering about its progress if you are interactively dd-copying a large disk.

To illustrate, you run the following (valid, but perhaps not very useful) dd copy:

$ dd if=/dev/random of=/dev/null bs=1K count=100 

It will run for a few minutes as it copies (and immediately discards) 100 blocks of randomly generated data, each of size 1 KB.

To get a progress report while dd is running, you need to open another virtual terminal, and then send a special USR1 signal to the dd process.

First, find out the process id of the dd process by running the following in the new virtual terminal.

$ pgrep -l '^dd$'
8789 dd
$

To send the USR1 signal to the dd prcoess:

$ kill -USR1  8789
$

Note that as soon as the USR1 signal is detected, dd will print out the current statistics to its STDERR.

$ dd if=/dev/random of=/dev/null bs=1K count=100
0+14 records in
0+14 records out
204 bytes (204 B) copied, 24.92 seconds, 0.0 kB/s

After reporting the status, dd will resume copying. You can repeat the above kill command any time you want to see the interim statistics. Alternatively, you can use the watch command to execute kill at a set interval.

$ watch -n 10 kill -USR1 8789

P.S.

Other articles from this blog on the dd command:
Create files of a given size

Tuesday, June 3, 2008

How to number each line in a text file on Linux

Some Linux commands support options that will number the input lines as a side effect, e.g., grep, and cat. The nl command is on the other hand dedicated to the task of numbering lines in a text file. If you want maximum flexibility, sed or perl is your best bet.

Suppose you want to number the lines in the input.txt file which contains:
123

456

789


abc

def

ghi


Below are some ways to number input.txt:

  • cat -n
    $ cat -n input.txt
    1 123
    2
    3 456
    4
    5 789
    6
    7
    8 abc
    9
    10 def
    11
    12 ghi


  • grep -n
    $ grep -n '^' input.txt
    1:123
    2:
    3:456
    4:
    5:789
    6:
    7:
    8:abc
    9:
    10:def
    11:
    12:ghi


  • nl

nl inserts the line number at the beginning of each non-empty line. By default, the line number is 6 characters wide, right justified with leading spaces. A tab is inserted by default after the line number.
$ nl input.txt
1 123

2 456

3 789


4 abc

5 def

6 ghi


If your file is small, 6 is perhaps too wide for the line number field. To adjust the width of the line number, use the -w option. To make nl number all lines including blank ones, add -ba option.
$ nl -ba -w 3 input.txt
1 123
2
3 456
4
5 789
6
7
8 abc
9
10 def
11
12 ghi


If you don't want a tab after the line number, you can replace the tab with null (no separator between line number and rest of line), or any string you want. Use -s '' for no separator or -s ' ' for a space.
$ nl -ba -w 3  -s ' ' input.txt
1 123
2
3 456
4
5 789
6
7
8 abc
9
10 def
11
12 ghi


If you prefer left justifying the line numbers, set the field width to 1 (or use -n ln option).

$ nl -ba -w 1  input.txt
1 123
2
3 456
4
5 789
6
7
8 abc
9
10 def
11
12 ghi


nl is flexible enough to only number lines that match a regular expression. This is done by specifying the option -b p followed by a regular expression on the command line.

Number only those lines that start with either the character 1 or 4.

$ nl -b 'p^[14]' -w 3 -s ' ' input.txt
1 123

2 456

789


abc

def

ghi


Note that we specify -s ' ' to use a single space as the separator between line number and body text. This is used to preserve text alignment (the default tab will cause output to look messy).

Number only those lines that contain the "words" 12 or ef.
$ nl -b 'p12\|ef' -w 3 -s ' ' input.txt
1 123

456

789


abc

2 def

ghi

Saturday, May 31, 2008

How to disable vim syntax highlighting and coloring

Syntax highlighting is my top annoyance in using vi/vim. Syntax highlighting is just a fancy term meaning that the text editor will auto-color parts of a text file according to some rules that makes sense to it, using some default color scheme.

To be precise, only vim, not vi, has syntax highlighting. vi has a 2 color scheme only: background and foreground. Yet, on my Centos 4 system (and many other distros), the vi command is just a soft link to vim.

Syntax highlighting is useful, and usually nothing to complain about. However, I find the default vim color scheme to be an eye-killer for me.

If you are already in vi/m, you can disable it by typing
:syntax off (and press the return key).

To re-enable coloring, type
:syntax on (and press the return key).

If you want to permanently disable syntax highlighting, insert this in your ~/.vimrc file:
syntax off

Note that even with vim, there can be different versions. On my Debian Etch system, the vim is vim.tiny, and it does not support syntax highlighting. So, you don't need to explicitly disable syntax highlighting.

Tuesday, May 27, 2008

Use the OR operator in grep to search for words and phrases

grep is a very powerful command-line search program in the Linux world. In this article, I will cover how to use OR in the grep command to search for words and phrases in a text file.

Suppose you want to find all occurrences of the words "apples" and "oranges" in the text file named fruits.txt.

$ cat fruits.txt
yellow bananas
green apples
red oranges
red apples


$ grep 'apples\|oranges' fruits.txt
green apples
red oranges
red apples


Note that you must use the backslash \ to escape the OR operator (|).

Using the OR operator, you can also search for phrases like "green apples" and "red oranges". You must escape all spaces in a phrase in addition to the OR operator.
$ grep 'green\ apples\|red\ oranges' fruits.txt
green apples
red oranges


You can get away with not escaping the spaces or the | operator if you use the extended regular expression notation.
$ grep -E 'green apples|red oranges' fruits.txt
green apples
red oranges


egrep is a variant of grep that is equivalent to grep -E.
$ egrep 'green apples|red oranges' fruits.txt
green apples
red oranges


P.S. Additional grep articles from this blog:


Sunday, May 25, 2008

Root edit a file using emacs in the same session

We know that we should always log in using our regular non-root account, and only sudo in when necessary to do things that only root can do. Most of the time, you are logged in as a regular user, and you have your emacs editor open.

Now, you realize that you need to edit a file which is only writable by root (say /etc/hosts.allow).

What you can always do is to open up another emacs session with the right credential, and edit the file there:
$ sudo emacs /etc/hosts.allow


This becomes a little tedious, doesn't it?

A nifty little trick is to use tramp, an emacs package for transparent remote editing of files using a secure protocol like ssh. You then use tramp to ssh into localhost as root, and modify the target file.

tramp comes pre-packaged within GNU emacs 22+. This is pretty handy, especially if you have already configured and using it to remotely edit files.

If you are new to tramp, insert the following lines into ~/.emacs (your emacs configuration file), and restart emacs:
(require 'tramp)
(setq tramp-default-method "scp")


The scp method for tramp uses ssh to connect to the remote host. In this case, you are merely connecting to localhost as root. This provides security for you as you edit the file as root.

Note that if you are also using the emacs package recentf (for remembering the most recently opened files), insert the following line as well. Otherwise, when you restart emacs in subsequent sessions, it will prompt you for the root password.
(setq recentf-auto-cleanup 'never) 


That is it for configuring tramp for use in emacs.

With this setup, you can use the same emacs session you opened as a non-root user to edit a root-only writable file.

To edit the target file, hit Cntl-x followed by Cntl-f, and enter the following before hitting return:
/su::/etc/hosts.allow


When prompted, enter the password for root.

After you finish editing, save the file as you normally do in emacs.

A final note is that you need to be aware of the side-effects of using tramp to edit a file while the auto backup feature of emacs is enabled. Specifically, make sure that the backup file is saved in an expected safe location. See this article for more details.

Thursday, May 22, 2008

Delete Windows/DOS carriage return characters from text files

Different operating system may use different characters to indicate the line break. Unix/Linux uses a single Line Feed (LF) character as line break. Windows/DOS uses 2 characters: Carriage Return/Line Feed (CR/LF). MacOS uses CR.

Nowadays, it is a reality that we operate on multiple platforms. If you transfer a text file created on a Windows machine to a Linux machine, the file will contain those extra Carriage Return characters. Some Linux programs run just fine with those characters in their input, but some are less forgiving.

Below are various ways to remove the Carriage Control characters from each line of a text file:

  • dos2unix
    $ dos2unix input.txt 
    dos2unix: converting file input.txt to UNIX format ...


    dos2unix will convert and overwrite the input file by removing the CR characters.

    Be warned that dos2unix is not by default pre-installed in all Linux distributions. If you have a RedHat-based distribution (e.g., Centos), you are safe.

    On my Debian Etch system, you need to install a package named fromdos, and even then, dos2unix is just a soft link to another program, fromdos. See next command.

  • fromdos
    fromdos and the corresponding todos reside in a package named tofrodos.

    To install,
    $ apt-get install tofrodos  


    To run fromdos,
     $ fromdos input.txt 


    Note that fromdos will overwrite the input.txt file.

  • tr

    $ tr -d '\r' < input.txt > output.txt
    $ cp output.txt input.txt


    \r is the carriage control character.

    tr -d removes the specified character (\r in this case) from the standard input.

    tr deals with the standard input and standard output only. So, tr cannot write directly to the original input file (input.txt): an intermediate file (output.txt) is needed.

  • sed
    $ sed -i.bak -e 's/\r//g' input.txt 


    The advantage of sed over tr is that you can do in-line substitution. No need to create an intermediate file. This is done by the -i option.

    If you want to make a backup of the original input.txt, you can specify a different file suffix like this:
    $ sed -i.bak -e 's/\r//g' input.txt 


    -i.bak will make a backup file by appending the suffix .bak to your original file name, resulting in something like input.txt.bak

  • perl
    $ perl -i.bak -pe 's/\r//g' input.txt


If your system has dos2unix or fromdos installed, then using either one is probably the simplest. Otherwise, tr seems like a safe bet, and it is available on all Linux systems, if you don't mind the extra step of copying the intermediate file. If you absolutely want a one-liner to do the job, then either sed or perl with their in-line modification will satisfy you.

Tuesday, May 20, 2008

Run ifconfig as non-root user for read-only access to network interfaces

It is a frequent scenario that you are logged in to the console of a Linux system, and you need to know its IP address.

If you are the root user, that is easy:
$ ifconfig
eth0 Link encap:Ethernet HWaddr 00:0B:6B:E1:BC:14
inet addr:192.168.0.103 Bcast:192.168.0.255 Mask:255.255.255.0
inet6 addr: fe80::20b:6aff:fed0:bb04/64 Scope:Link
UP BROADCAST RUNNING MULTICAST MTU:1500 Metric:1
RX packets:8100 errors:0 dropped:0 overruns:0 frame:0
TX packets:7727 errors:0 dropped:0 overruns:0 carrier:0
collisions:0 txqueuelen:1000
RX bytes:5385440 (5.1 MiB) TX bytes:1454259 (1.3 MiB)
Interrupt:177 Base address:0xdc00

lo Link encap:Local Loopback
inet addr:127.0.0.1 Mask:255.0.0.0
inet6 addr: ::1/128 Scope:Host
UP LOOPBACK RUNNING MTU:16436 Metric:1
RX packets:68 errors:0 dropped:0 overruns:0 frame:0
TX packets:68 errors:0 dropped:0 overruns:0 carrier:0
collisions:0 txqueuelen:0
RX bytes:5204 (5.0 KiB) TX bytes:5204 (5.0 KiB)


However, if you are not root....
$ ifconfig
bash: ifconfig: command not found


At this point, you are probably ready to give up. Don't: there is always hope.

A not well-publicized fact is that the ifconfig command is executable by anyone: it is just NOT on the default PATH for non-root users.

To find out where ifconfig is:
$ whereis ifconfig
ifconfig: /sbin/ifconfig /usr/share/man/man8/ifconfig.8.gz


Is it true that anyone can run ifconfig?
$ ls -l /sbin/ifconfig
-rwxr-xr-x 1 root root 66024 Aug 12 2006 /sbin/ifconfig

The answer is yes.

To run ifconfig, /sbin needs to be on your PATH, is it?
$ echo $PATH
/usr/kerberos/bin:/usr/local/bin:/bin:/usr/bin:/usr/X11R6/bin:/opt/cdk4msp/bin:/home/peter/bin

No, afraid not. No wonder you cannot run the ifconfig command.

It is straight-forward to append that to your PATH.
$ export PATH=$PATH:/sbin
$ echo $PATH
/usr/kerberos/bin:/usr/local/bin:/bin:/usr/bin:/usr/X11R6/bin:/opt/cdk4msp/bin:/home/peter/bin:/sbin


Let's give ifconfig another try.
$ ifconfig
eth0 Link encap:Ethernet HWaddr 00:0B:6B:E1:BC:14
inet addr:192.168.0.103 Bcast:192.168.0.255 Mask:255.255.255.0
inet6 addr: fe80::20b:6aff:fed0:bb04/64 Scope:Link
UP BROADCAST RUNNING MULTICAST MTU:1500 Metric:1
RX packets:8590 errors:0 dropped:0 overruns:0 frame:0
TX packets:8218 errors:0 dropped:0 overruns:0 carrier:0
collisions:0 txqueuelen:1000
RX bytes:5530730 (5.2 MiB) TX bytes:1509759 (1.4 MiB)
Interrupt:177 Base address:0xdc00

lo Link encap:Local Loopback
inet addr:127.0.0.1 Mask:255.0.0.0
inet6 addr: ::1/128 Scope:Host
UP LOOPBACK RUNNING MTU:16436 Metric:1
RX packets:68 errors:0 dropped:0 overruns:0 frame:0
TX packets:68 errors:0 dropped:0 overruns:0 carrier:0
collisions:0 txqueuelen:0
RX bytes:5204 (5.0 KiB) TX bytes:5204 (5.0 KiB)


To save some typing, you can combine the setting of the PATH, and the ifconfig command as follow:
$ PATH=$PATH:/sbin ifconfig


Now, non-root users are happy.

Note that only non-root users can only get/read interface data, but not set/write it. Setting interface parameters as a non-root user will generate errors:

$ ifconfig eth0 192.168.0.155
SIOCSIFADDR: Permission denied
SIOCSIFFLAGS: Permission denied

Monday, May 19, 2008

Ping or nmap to identify machines on the LAN

You can use ping or nmap to find out what machines are currently on the local network.

The first method involves pinging the LAN broadcast address.

To find out the broadcast address of the local network:
$ ifconfig eth0
eth0 Link encap:Ethernet HWaddr 01:1B:6B:D8:B1:26
inet addr:192.168.0.103 Bcast:192.168.0.255 Mask:255.255.255.0
inet6 addr: fe80::20b:6aff:fed0:bb04/64 Scope:Link
UP BROADCAST RUNNING MULTICAST MTU:1500 Metric:1
RX packets:70324 errors:0 dropped:0 overruns:0 frame:0
TX packets:69429 errors:0 dropped:0 overruns:0 carrier:0
collisions:0 txqueuelen:1000
RX bytes:28758708 (27.4 MiB) TX bytes:9680092 (9.2 MiB)
Interrupt:177 Base address:0xdc00


From the ifconfig output, we determine that the broadcast address is 192.168.0.255. Now, we ping the broadcast address.

$ ping -b -c 3 -i 20 192.168.0.255
WARNING: pinging broadcast address
PING 192.168.0.255 (192.168.0.255) 56(84) bytes of data.
64 bytes from 192.168.0.100: icmp_seq=1 ttl=64 time=0.208 ms
64 bytes from 192.168.0.1: icmp_seq=1 ttl=150 time=0.625 ms (DUP!)
64 bytes from 192.168.0.100: icmp_seq=2 ttl=64 time=0.218 ms
64 bytes from 192.168.0.1: icmp_seq=2 ttl=150 time=0.646 ms (DUP!)
64 bytes from 192.168.0.100: icmp_seq=3 ttl=64 time=0.217 ms

--- 192.168.0.255 ping statistics ---
3 packets transmitted, 3 received, +2 duplicates, 0% packet loss, time 39998ms
rtt min/avg/max/mdev = 0.208/0.382/0.646/0.207 ms


Note that:
-b is required in order to ping a broadcast address.
-c is the count (3) of echo requests (pings) it will send.
-i specifies the interval in seconds between sending each packet. You need to specify an interval long enough to give all the hosts in your LAN enough time to respond.

The ping method does not guarantee that all systems connected to the LAN will be found. This is because some computers may be configured NOT to reply to broadcast queries, or to ping queries altogether.

The second method uses nmap. While nmap is better known for its port scanning capabilities, nmap is also very dependable for host discovery.

You can run nmap as either a non-root user, or root. nmap will only give non-root users the IP address of any host found.
$ nmap -sP 192.168.0.1-254

Starting Nmap 4.11 ( http://www.insecure.org/nmap/ ) at 2008-05-19 17:02 PDT
Host 192.168.0.1 appears to be up.
Host 192.168.0.100 appears to be up.
Host 192.168.0.103 appears to be up.
Nmap finished: 254 IP addresses (3 hosts up) scanned in 2.507 seconds


If you run nmap as root, you will also get the MAC address:
$ nmap -sP  192.168.0.1-254

Starting Nmap 4.11 ( http://www.insecure.org/nmap/ ) at 2008-05-19 18:06 PDT
Host 192.168.0.1 appears to be up.
MAC Address: 03:05:6D:2D:87:B3 (The Linksys Group)
Host 192.168.0.100 appears to be up.
MAC Address: 00:07:95:A9:3A:77 (Elitegroup Computer System Co. (ECS))
Host 192.168.0.103 appears to be up.
Nmap finished: 254 IP addresses (3 hosts up) scanned in 5.900 seconds


-sP instructs nmap to only perform a ping scan to determine if the target host is up; no port scanning or operating system detection is performed.
By default, the -sP option causes nmap to send an ICMP echo request and a TCP packet to port 80.

Using either ping or nmap, you can find out what machines are connected to your LAN.