Many virtualization software (aka hypervisors) can run on the host operating system of Linux. Notable open-source software include VirtualBox, KVM, and Xen. As part 1 of a 4-part series, this post outlines how to 1) install VirtualBox on Debian 10 (buster), and 2) build a FreeBSD virtual machine. Parts 2, 3, and 4 cover, respectively, additional post-installation tasks, how to access USB flash drives on the guest OS, and how to share folders between host and guest.
About VirtualBox
In 2010, Oracle acquired Sun Microsystems and, as a result, took over the ownership of several open-source technologies including VirtualBox and mySQL. Subsequently, VirtualBox was rebranded as Oracle VM VirtualBox, but the software has remained free and open-source.
VirtualBox, like KVM, is a type-2 hypervisor, meaning that it runs as a process on the host OS (Linux). In contrast, XEN is a type-1 hypervisor which runs directly on top of the bare-metal hardware. Type-1 hypervisors have an inherent advantage over type-2 regarding performance. Yet, type-2 hypervisors, such as VirtualBox, benefit from the continual advancement of their underlying OS.
Hypervisors typically support the same multitude of guest operating systems including Linux, BSD, Solaris, Mac OS X, and Windows. But, hypervisors vary in what host OSes they support. For instance, KVM only runs on Linux. VirtualBox, on the other hand, runs on multiple host platforms such as Linux, Solaris, macOS, and Windows.
Prepare for installation
Perform the following steps prior to installing VirtualBox:
1. Enable virtualization technology in BIOS.
2. Download the guest OS (FreeBSD) ISO.
Enable virtualization in BIOS
In 2005, chip manufacturers introduced the instruction set extensions Intel VT and AMD-V to support hardware virtualization. Before that, all virtualization was done with software. VirtualBox supports both software and hardware virtualization. If hardware virtualization support is not available on a machine, VirtualBox will switch to software virtualization. Note that without hardware virtualization, VirtualBox can only create 32-bit virtual machines. In other words, a 64-bit virtual machine is only possible if hardware support is available.
To determine if your CPU supports hardware virtualization, run the following command:
$ egrep '^flags.*(vmx|svm)' /proc/cpuinfo
The above command searches the CPU flags register for either 'vmx' (Intel VT) or 'svm' (AMD-V). If the result is non-nil, your machine does have hardware-assisted virtualization.
Even if your machine supports hardware virtualization, it does not necessarily mean that it is currently enabled. To confirm that it is enabled, reboot the machine and enter BIOS. Once inside the BIOS, look for an option to turn on virtualization technology.
Download FreeBSD ISO
VirtualBox is a full-virtualization hypervisor(as opposed to para-virtualization), meaning that the guest OS, FreeBSD in this case, can be used as is, without modification. Having said that,
you are responsible for downloading the guest OS yourself.
You can download the latest installer image (release 11.1) from the FreeBSD website. You have the options of downloading regular Installer Images, Virtual Machine Images, and SD Card Images. For this tutorial, use regular Installer Images. (VirtualBox does not support all Virtual Machine image formats.) Make sure that you select the right hardware architecture (amd64 vs i386).
Within the architecture, download the compressed disk image file with the disc1.iso.xz suffix and the corresponding SHA512 checksum file. The .xz file is about 40% smaller in size than the uncompressed version and will save you download time.
After you have downloaded the 2 files, decompress the disk image file and do a checksum using the respective commands below.
$ unxz FreeBSD-11.1-RELEASE-amd64-disc1.iso.xz

$ sha512sum -c CHECKSUM.SHA512-FreeBSD-11.1-RELEASE-amd64

...

FreeBSD-11.1-RELEASE-amd64-disc1.iso: OK

...
Install VirtualBox
The following commands need to be executed with root privilege.
- Add the source repository for VirtualBox.
# echo deb http://download.virtualbox.org/virtualbox/debian buster contrib > /etc/apt/sources.list.d/virtualbox.list
- Import the Oracle GPG public key.
# wget -q https://www.virtualbox.org/download/oraclevbox2016.asc -O- | apt-key add -

OK
- Install VirtualBox.
# apt update

# apt install virtualbox-6.1
Create FreeBSD VM
After installing VirtualBox, run it for the first time by clicking
Oracle VM VirtualBox in your menu system. For the Xfce desktop, the option is under the System submenu. Then, click New to create a virtual machine.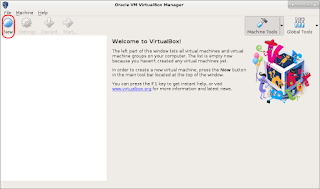
Next, provide a host name, and specify the
Type (BSD), and Version (FreeBSD 64-bit or 32-bit).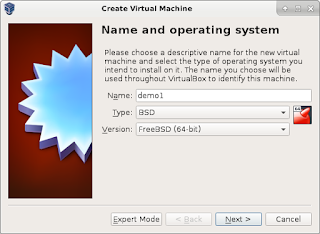
The remaining steps configure the memory size, create a virtual hard disk and specify its file format, its pathname and size, and whether storage is dynamic or fixed-sized. At each step, reasonable defaults are given, and can be accepted unless your requirements dictate otherwise. Click
Create at the end to create the virtual machine.The virtual machine is in the powered-off state after creation. Next, power up the machine by clicking
Start.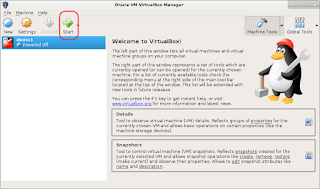
At this point, the VM has no operating system. Powering it on prompts you to insert a start-up disk. Click the folder icon to specify the file path for the disk image file downloaded earlier (
FreeBSD-11.1-RELEASE-amd64-disc1.iso).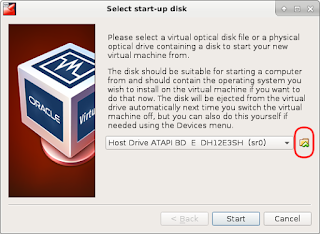
Continue by selecting
Start. The FreeBSD boot-up screen appears. Hit Enter to boot.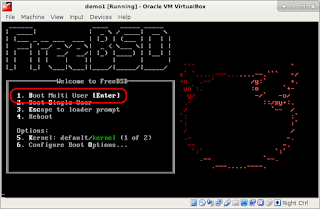
Select
Install to continue installation.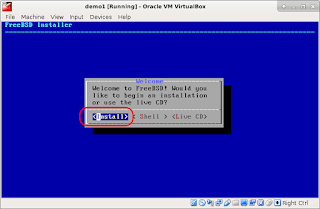
The FreeBSD installer now takes over, and prompts you for information it needs to configure the system.
At the end, the installer will prompt you to reboot into the installed system. At this point, you should reboot, but first you must unmount the disk image file (otherwise, you will boot into the CD image again). The reboot procedure I recommend is as follows. First, close the VM window by clicking the X in the upper right-hand corner.
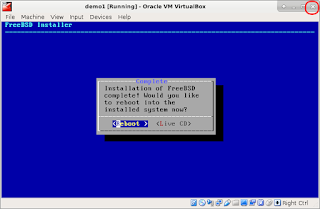
In the ensuing dialog box, select
Power off the machine.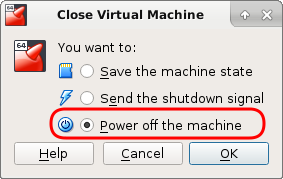
To unmount the CD disk image, click the
Machine Tools down-arrow, and select Details.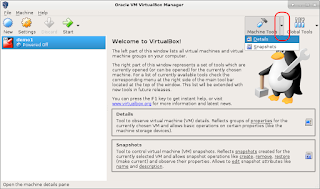
In the Storage section, right click the
Optical Drive besides the IDE Secondary Master label, and select Remove disk from optical drive.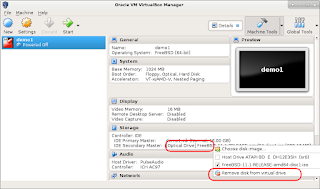
Now that the CD image is unmounted, you can click
Start in the upper left-hand corner to boot the VM.Post-installation
VirtualBox offers additional functionalities via guest-specific addition packages. Guest additions packages enable the sharing of folders and the clipboard between host and guest. Follow the procedure below to install VirtualBox guest additions for FreeBSD.
- Login to FreeBSD as
root. - Install the VirtualBox guest addition packages.
# pkg install emulators/virtualbox-ose-additions
- Append the following 2 lines to the startup configuration file
/etc/rc.conf.
vboxguestenable="YES"


vboxserviceenable="YES"
- Add each X11 user (say
peter) to thewheelgroup.
# pw groupmod wheel -m peter
- Reboot the VM to have the changes take effect.
Summary & conclusion
VirtualBox is easy to install. With VirtualBox, creating a FreeBSD virtual machine on a Linux host machine is straightforward. If you are looking for a open-source multi-platform hypervisor, VirtualBox should be high on your priority list.
Related posts
- Part 2 - post-installation.
- Part 3 - on mounting USB drives.
- Part 4 - on sharing folders.
