Tuesday, May 1, 2018

Snaps as self-contained, auto-updating, universal software packages

One of Linux's unique selling points is that users can choose from a variety of Linux distributions, each with its own features and advantages. However, a byproduct of the proliferation of distributions is that Linux developers are burdened with extra labor to package and deploy software in multiple incompatible package formats, such as RPM and DEB, using different package managers.

There have been several attempts to address this obstacle of deploying software across multiple Linux distributions. The latest such initiative, spearheaded by none other than the venerable Canonical Ltd, the Ubuntu developer, is Snapcraft. Snapcraft is the developer tool for packaging software in the universal snap format.

The rest of this post explains how to use snaps, from a user rather than developer's perspective.

[2018-05-23 update] A snap from the official Snap store was found to contain hidden cryptocurrency mining code, and was since removed from the store. The news highlight the fact that the mere existence of a snap in the Snap store does not guarantee its integrity. The lesson is to only use snaps from trusted sources featured in the Snap store, such as the original software author, an official maintainer, or a trusted community source.

What are snaps?

Snaps are universal software packages that can be deployed across the major Linux distributions and architectures including IoT. Although snaps is a format championed by the creator of Ubuntu, it is supported on all major Linux distributions including Debian, Ubuntu, Mint, Fedora, Gentoo, ArchLinux, Manjaro, and OpenSUSE.

Besides being distribution-agnostic, snaps are also self-contained. Linux users are all too familiar with "the dependency hell", ie, the occasional extreme frustration experienced in software installation due to dependency issues. A snap is self-contained in that it bundles the required runtime libraries inside the package.

Once you install a snap on your system, it will be auto-updated to run the latest release. You however can manually roll back to a previous version of the software if you so desire.

In summary, snaps are universal, self-contained, auto-updating Linux software packages.

Install snapd

To be able to run snap packages on your Linux system, you must first install snapd, the service responsible for running and managing snaps. The following command will install snapd on a Debian system.
$ sudo apt install snapd

The Snap store

You can search the relatively small but growing online Snap store for snaps to install. Alternatively, you can search using the command-line interface:
$ snap find firefox
Name     Version   Developer  Notes  Summary
firefox  59.0.2-1  mozilla    -      Mozilla Firefox web browser

Why would you download the firefox snap when firefox is readily available as a DEB, via the Debian standard repository? Similarly, chromium and libreoffice belong to the same category of software. The answer is that, in most cases, snaps offer a much more recent version of the software than that from the native Linux package manager. For instance, Debian 9 ("Stretch") packages FireFox 52 in its standard repository whereas you can get Firefox 59 as a snap.

The Snap store features some snaps that are not available from the standard repositories of major Linux distributions. Examples are ghostwriter and vidcutter. Instead of building such software manually, you can download and deploy their corresponding snaps from the Snap store.

Below is a non-exhaustive list of software available in snaps that I personally find useful(or fun).
  • Chromium
  • Firefox
  • Ghostwriter-casept (a Markdown editor)
  • LibreOffice
  • Minecraft
  • Nextcloud
  • OBS Studio (for screencasting and live video streaming)
  • Opera
  • Skype
  • Slack
  • Solitaire
  • Spotify
  • VidCutter (a video editor)

To find out more about a particular snap, execute the following command:
$ snap info minecraft
name:      minecraft
summary:   Minecraft is a game about placing blocks and going on adventures.
publisher: snapcrafters
license:   Proprietary
description:   A game about placing blocks while running from skeletons
snap-id: aJQRf6WPQq04DH0TB2HdTB6K9rf6I1yX
channels:                
  stable:    latest (11) 148MB -
  candidate: latest (11) 148MB -
  beta:      latest (11) 148MB -
  edge:      latest (11) 148MB -

How to install a snap

Installing a snap is as easy as:
$ sudo snap install solitaire

If you don't have root privileges, you can still install snaps by first signing in to the Ubuntu Snap store. You will need an Ubuntu One account (which is free).
$ sudo snap login <your-email-address>
$ snap install solitaire

To list the snaps already installed on your system:
$ snap list
Name       Version    Rev   Tracking  Developer  Notes
core       16-2.32.1  4327  stable    canonical  core
skype      8.18.0.6   23    stable    skype      classic
solitaire  1.0        2     stable    1bsyl      devmode

To purge a snap from your local system:
$ sudo snap remove solitaire

Note that the above command will delete all snap-specific data and settings.

How to run a snap

Installing a snap in most cases will automatically create a shortcut on your desktop menu system. For instance, you will find an entry for the solitaire snap in the Games sub-menu.

Alternatively, you can always run the snap command explicitly on the command line.
$ snap run <your snap command>

The caveat with the command-line approach is that the snap argument may not always be obvious. For instance, with the solitaire snap, the corresponding name to use for the run command is solitaire.1bsyl, not solitaire. You can find out the specific name to use by examining snap's bin directory:
$ ls /snap/bin/
skype  solitaire.1bsyl
$ snap run solitaire.1bsyl

Tuesday, April 3, 2018

Scanning HTTPS for Mixed Content

Back in 2014, Google raised the awareness of using HTTPS ("Secure HTTP") by making its use a ranking signal in Google search algorithms. HTTPS essentially establishes secure encrypted connections to the cloud. Google further raised the stake of not using HTTPS by announcing that, beginning in July 2018, the Google Chrome browser with the release of Chrome 68 will mark all HTTP websites as being insecure. The consequence of not converting to HTTPS is that site visitors will be persuaded by the warning message to bounce from your website.
Even before the impending drop dead date, Chrome and other popular web browsers such as Firefox and Edge have been warning visitors to HTTP-connected sites with an informational message.


Web administrators had taken heed and converted their websites to HTTPS, many taking advantage of the free SSL certificates issued by Let's Encrypt. However, if you have successfully converted to HTTPS, your work may not be done. You still need to verify that your website is properly recognized as being secure. You want to see the padlock icon displayed next to the web page's URL in the browser window.

To many administrators' surprise, even a properly converted HTTPS website may still be marked as being insecure. This is most likely due to the website's mixed content. For a web page to be deemed secure, everything loaded by that page must be encrypted by HTTPS. A web page with mixed content loads both encrypted as well as non-encrypted contents such as images, videos, stylesheets and scripts.

While it is possible to manually spot mixed web content on a web page, checking a non-trivial website requires automation. Mixed Content Scan is a command-line web crawler which scans for mixed content. The rest of this post explains how to install and use the tool.

Installation

Mixed Content Scan is a batch PHP application. To install the tool, use composer, a PHP package dependency manager. For the latest instructions on how to install composer, please refer to this link. Note that the said procedure installs composer in the current directory. Optionally, move the executable to a globally accessible directory using the following command.
$ sudo mv composer.phar /usr/local/bin/composer
To install Mixed Content Scan:
$ composer global require bramus/mixed-content-scan:~2.8
The Mixed Content Scan executable is placed in ~/.config/composer/vendor/bramus/mixed-content-scan/bin.

Scanning for mixed content

To scan a website for mixed content, simply provide its URL as an argument to Mixed Content Scan:
$ cd ~/.config/composer/vendor/bramus/mixed-content-scan/bin
$ ./mixed-content-scan https://shadowofyourwings.com/
By default, the tool outputs the scan report on the terminal("standard output"). Alternatively, you can specify an output file using the --output parameter as follows:
$ cd ~/.config/composer/vendor/bramus/mixed-content-scan/bin
$ ./mixed-content-scan --output <some/file/path> https://shadowofyourwings.com/
You can also use the --ignore parameter to specify a file which contains URL patterns that the tool will ignore and not scan. The example site I use is a WordPress website. The scanning tool comes with a sample ignore file for WordPress which is located in ~/.config/composer/vendor/bramus/mixed-content-scan/bin/ignorepatterns/wordpress.txt.


$ cd ~/.config/composer/vendor/bramus/mixed-content-scan/bin
$ ./mixed-content-scan --ignore=~/.config/composer/vendor/bramus/mixed-content-scan/bin/ignorepatterns/wordpress.txt https://shadowofyourwings.com/
[2018-02-16 16:53:18] MCS.NOTICE: Scanning https://shadowofyourwings.com/
[2018-02-16 16:53:18] MCS.ERROR: 00000 - https://shadowofyourwings.com/
[2018-02-16 16:53:18] MCS.WARNING: http://gmpg.org/xfn/11
[2018-02-16 16:53:19] MCS.ERROR: 00001 - https://shadowofyourwings.com/about
[2018-02-16 16:53:19] MCS.WARNING: http://shadowofyourwings.com/wp-content/uploads/2017/05/peterLeung.jpg
[2018-02-16 16:53:19] MCS.WARNING: http://gmpg.org/xfn/11

[2018-02-16 16:53:20] MCS.ERROR: 00002 - https://shadowofyourwings.com/contact
[2018-02-16 16:53:20] MCS.WARNING: http://gmpg.org/xfn/11
... <output snipped> ...
[2018-02-16 16:53:38] MCS.NOTICE: Scanned 26 pages for Mixed Content

Mixed Content Scan numbers each page scanned, starting from 00000. In the above example, the About page (00001) has been flagged as having mixed content. The sources of mixed content as loaded by that page are twofold:
  1. Vulnerable image file.
    The peterLeung.jpg file is being loaded via the insecure HTTP connection. The fix is simple: go to the WordPress administration web page, and change HTTP to HTTPS on the About web page.
  2. Theme header profile
    The header of the default twentyseventeen WordPress theme contains a reference to http://gmpg.org/xfn/11. The code is in <document root>/wp-content/themes/twentyseventeen/header.php.

    Although the scanner reports its occurrence as a violation, browsers generally do not flag this as a mixed content error. This error can be safely ignored.

Friday, March 16, 2018

A review of 3 best-of-breed Markdown editors


As a technology blogger, I write HTML documents that are hosted on different platforms such as WordPress, Drupal, and Blogger. I like to compose HTML using the Markdown markup language. Unfortunately, the HTML editors bundled with the aforementioned platforms do not support Markdown natively. It is true that you can download Markdown plugins for WordPress and Drupal. But, at the end, I still find the HTML editors to be too intrusive for a writer such as myself to stay focused and productive.

Fortunately, there are many good special-purpose Markdown editors out there. My web authoring process involves first composing the document using a Markdown editor, and then copying and pasting the output HTML into the Content Management System(CMS). Below, I evaluate 3 open-source Markdown editors: justmd, Remarkable, and ghostwriter.

I will evaluate each editor from two sometimes conflicting viewpoints, that of a geek and a writer. As a geek, I side with editors that have many bells and whistles. But, as a writer, I prefer editors that help me create, often by filtering out as much distraction as possible, and forcing me to focus on the next word, phrase, sentence to put on the page.

justmd
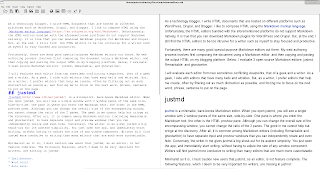
justmd is a minimalist, bare-bones Markdown editor. When you open justmd, you will see a single window with 2 window panes of equal size, located side-by-side. One pane is where you enter the Markdown text; the other is the HTML preview pane. Although you can change the overall size of the encompassing window, you cannot change the ratio of the 2 panes. The geek in me cannot help but cringe at the discovery. After all, it is common among Markdown editors (including Remarkable and ghostwriter) to have separate input and preview windows that you can independently resize and even hide. Conversely, the writer in me gives justmd a big shout-out for its austere simplicity. You just open the app, and immediately start writing, without having to adjust the size of any window component. Writers will find justmd more conducive to writing than many editors that are much more customizable.

Minimalist as it is designed to be, justmd, as a Markdown editor, is not feature complete in its current status. The following features, which I deem to be very important for writers, are still missing in justmd:

  • Spellchecker.
  • Word count.
  • Auto save.

This post was written entirely using justmd, and the overall experience was very positive. The lack of a spellchecker and word counter did not hamper the writing at all. On the contrary, it enhances my productivity by breaking the bad habits of constantly checking the word count and looking out for spelling errors in the midst of writing. Most Content Management Systems are capable of spellchecking and word counting. So, those tasks can be deferred until later, after you paste the HTML into the CMS.

Finally, I comment on the ease of installing justmd. None of the 3 editors being reviewed here are pre-packaged in the official repository of a major Linux distribution. Having said that, installing justmd is as easy as 1-2-3.

  1. Download compressed tarball from justmd website.
  2. Uncompress the tarball using command tar -zxvf justmd-linux-x64-v1.1.1.tar.gz.
  3. Create shortcut to justmd binary.

Remarkable
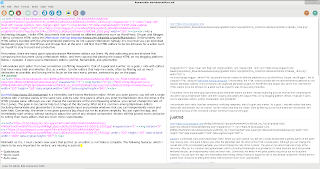
Featurewise, Remarkable is middle-of-the-road, between justmd and ghostwriter. It has word counting, but no spellchecking. Like justmd, both input and preview functions coexist as panes side-by-side in a single window, but you can stack them vertically or horizontally, and you can resize each pane proportionally within the window.

Now, as a writer, I find Remarkable's user interface too colorful, too distracting. Specifically, its overly generous use of color for syntax highlighting and icon design is detrimental to the primary writing task. With color, less is more.

You can download the Remarkable package in .deb or .rpm format from its Linux download page. Users of Debian, Ubuntu, Fedora, SUSE, and Arch systems will find installation straightforward.

ghostwriter

ghostwriter is the most mature and feature complete of all 3 MarkDown editors. It offers spellchecking, word counting, auto saves, and much more.

Two unique features are especially noteworthy to writers: Hemingway and Focus modes. In Hemingway mode, two particular keyboard keys are disabled, namely, the delete and the backspace keys. The rationale is to increase productivity by delaying document editing as much as possible. In Focus mode, only the portion of the document you are working on is made prominent, and the rest fades out. You can configure the focus to be the current sentence, the current single or 3 lines, or the current paragraph.

Despite the rich feature set, the ghostwriter user interface is surprising clean and uncluttered.

The input and live preview functions reside in separate windows that you can resize and move around individually. Keen observers will definitely notice there is a real-time lag between actual text input and the update of the live preview. This is not a bug in the program. On the contrary, ghostwriter is programmed to only update the live preview when you stop typing(for a fraction of a second). The technical reason given by the developers is that the delay smoothens the jitters in synchronizing the rendering of large files. I can see many writers actually support this design decision because attention should be primarily focused on the writing, not the rendering, of the document.

Recall that the overall objective for using a MarkDown editor is to generate HTML code to insert into a CMS. With justmd and Remarkable, you need to first export to a HTML file, and then import the file (or copy and paste its contents) into the CMS. On the other hand, ghostwriter provides a shortcut Copy HTML button which is discreetly tucked away at the bottom right of the window. The button is a minor feature in the overall design scheme, but has a disproportionally high value to end users. Clicking the button copies the HTML code in its entirety into the clipboard. Importing the HTML into the CMS simply involves pasting the contents of the clipboard.

ghostwriter provides packages for Ubuntu , Fedora, openSUSE, and Arch Linux AUR. If you run Ubuntu or any of its derivatives such as Linux Mint, ghostwriter can be installed after adding a PPA repository and updating the local cache.

sudo add-apt-repository ppa:wereturtle/ppa
sudo apt update
sudo apt install ghostwriter

If ghostwriter is not pre-packaged for your distro, e.g., Debian, you can follow the on-line instructions to build the executable yourself. Depending on the particular distro and release, be prepared to spend some considerable time as you may run into the proverbial Linux dependency hell.

Feature comparison

Features justmd Remarkable ghostwriter
Cross-platform Linux(x64), Windows(x64), macOS Linux, Windows Linux, Windows
Linux installation Downloadable executables Downloadble packages for Debian, Ubuntu, Fedora, openSUSE, Arch Downloadble packages for Ubuntu, Fedora, openSUSE, Arch
Export to HTML, PDF Yes Yes HTML, PDF, Word, ODT
Spellchecker No No Yes
Auto save No No Yes
Word count No Character, word, line counts Character, word, line, sentence, paragraph, page counts
Live preview Fixed window proportion Hidable, variable proportion Separate resizable window (no dual panel)
GitHub-flavored syntax Support for tables Yes (tables, strikethrough, emphasis, etc) Yes (tables, strikethrough, emphasis, etc)

Summary & conclusion

A writer's working style is intrinsically idiosyncratic. A writing environment that is distraction-free to one person may not be stimulating enough for another. Yet, ghostwriter is the clear winner of the 3 editors because it strikes a balance between clean design and feature richness. However, if ghostwriter is not pre-packaged for your Linux distro (say Debian), justmd and Remarkable are definitely worthwhile alternatives.

Thursday, March 1, 2018

Sharing folders between VirtualBox host and guest machines


This post is the 4th installment of the VirtualBox series. The focus is on how to share folders between the host and the guest OSes. Part 1 of the series shows how to install VirtualBox on a Debian host, and how to create a FreeBSD virtual machine. Part 2 outlines the post installation tasks, including installing the universal VirtualBox extension pack. Part 3 shows how the guest OS can access USB drives mounted on the host.
The method outlined in this blog post works for Linux and Windows guest OSes but not FreeBSD. You can set up NFS or Samba to share a folder between a Linux host and a FreeBSD guest.

Prerequisites

To share a folder using the following procedure, the OS-specific guest additions package must be pre-installed. Part 1 of this series includes instructions for installing the guest additions package for the FreeBSD guest OS.

Procedure

  1. Declare the shared folder on host OS.
    Open the Oracle VM VirtualBox manager on your host machine, select the target guest OS, and click Settings. Note that your guest machine does NOT need to be powered off.
  2. Select Shared Holders, and click the Plus button to add a shared folder. Note that you can have more than 1 shared folder.
  3. Specify the path for the shared folder.
    Click the down arrow next to the Folder Path parameter, select Other, and navigate to the target shared folder.
  4. Configure the shared folder.
    The Folder name field refers to the folder name on the guest OS, which defaults to the folder name you specified in the last step. You should note the folder name in order to identify the full folder pathname on the guest OS. For example, if the shared folder on the host machine is /home/peter/Music, the corresponding folder name defaults to /media/sf_Music on the Ubuntu guest OS, and \\vboxsvr\Music on the Windows guest OS.

    The Auto-mount checkbox should be enabled. Optionally, you can also mount the folder manually, but then you must modify access permissions in order to make the folder writable by non-root users.

    Unless the shared folder is for one-off use only, you should enable the Make Permanent checkbox.
  5. Power recycle the guest machine.
  6. Grant folder access permission to non-root users.
    This step only applies to Linux guest OS(not Windows). Login to the guest OS, and add regular users to the vboxsf group using the following command.

    sudo usermod -aG vboxsf <someuserID>

Related posts

Wednesday, February 14, 2018

Ubuntu: how to reset lost administrative password

After an extended vacation, I came home to discover to my horror that I could no longer login to my seldom-used Ubuntu laptop. The reason was embarrassingly simple: I forgot my password. My muscle memory (or finger memory) did not help while I was frantically typing my usual passwords but to no avail. I own the administrative account on that system. So, I had no one else to turn to for help. Luckily, I was able to login another machine and google how to reset the administrative password on Ubuntu.

Prerequisites

There are 2 preconditions for using the procedure to reset the administrative password.
  1. Physical access to machine.
    You need to access the system console in order to interrupt loading of the OS.
  2. The root password was disabled.
    By default, Ubuntu disables the password of the root account by assigning it a value which cannot possibly match any encrypted value. During the installation of Ubuntu, you were asked to create the first user. That initial user, by default, belongs to the sudo group which means that the user can be elevated to perform system administration functions. The administrative password which we are going to reset refers to the password of the initial user.
    The procedure assumes that you did not manually assign root a valid password. If root has a valid password and you know it, then you can simply sign on as root and reset the administrative password using the password command. If the root password was also forgotten, this procedure does not apply because you need to enter that password to drop to root shell prompt in this procedure.

How to reset administrative password

  1. Power recycle.
    After the BIOS screen appears, press down the left shift key to enter GRUB. This step can be quite finicky, and you may need to repeat it several times until you get the timing just right.
  2. Scroll down to Advanced options for Ubuntu, and press Enter.
  3. In the ensuing screen, scroll down to the top Recovery mode line, and press Enter.
    If the Linux kernel image had been upgraded on the machine before, you would see multiple recover mode lines on the screen. Select the recovery mode line that corresponds to the latest Linux image(that is nearest to the top).
  4. In the Recovery Menu screen, scroll down to root, and press Enter.
  5. Press Enter again.
    If you have previously assigned root a password, you would be prompted to enter it at this step. Otherwise, just press Enter to continue.
  6. Remount filesystem.
    After all the hard work, you are now at the root shell prompt. The filesystem at this point is read-only. Remount the file system to add write permission.
    # mount -o rw,remount /
    
  7. Reset administrative password.
    Use the passwd command to change the password for the administrative user.
    # passwd <adminuser>
    
    Press Control-D to return to the recovery menu.
  8. Select resume.
  9. Exit recovery.
    Press OK to exit recovery mode and continue booting.

Thursday, February 1, 2018

How to mount USB drives on VirtualBox


This is part 3 of the 4-part series on VirtualBox. This post shows you how to access, from your guest OS, a flash drive mounted on the Debian host. Parts 1, 2 and 4 demonstrate how to build a FreeBSD virtual machine using VirtualBox on a Debian host, perform post-installation tasks, and share folders.

Prerequisites

The VirtualBox extension pack must be installed on the VirtualBox host. See part 2 for instructions.

Configuring USB

Follow the steps below to configure VirtualBox USB.
  1. Add user to vboxusers group.
    VirtualBox access to the host's USB drives is only granted to users of the vboxusers group. As root on the host, run the following command to add each VirtualBox user (e.g., peter) to the group.
     # usermod -aG vboxusers peter
    
  2. Power off VM.
    VirtualBox defaults to using USB Controller 1.1 (OHCI). Modern hardware uses USB Controller 2.0(EHCI) and USB Controller 3.0(xHCI). Before you can change the USB controller protocol, the virtual machine must be powered off.
  3. Open VirtualBox Manager, click Settings, and select USB.
  4. Specify USB Controller.
    Select either USB 2.0 (EHCI) Controller or USB 3.0 (xHCI) Controller according to your actual hardware.

    Note that you can add USB Device Filters to define the types of USB drives which will be automatically made visible to the guest OS. Be forewarned that the USB drive, once made visible to the guest OS, will no longer be available to the host. More on the use of device filters in the next section.

Accessing USB drive

Below is the step-by-step procedure to mount and access a flash drive.
  1. Insert the flash drive into your host machine's USB port.
  2. Unmount the flash drive (if it is auto-mounted on your host).
    Making it available to the guest will automatically and instantly unmount it from the host. To avoid any data loss due to pending writes to the drive, it is a good practice to explicitly unmount the drive prior to handing control to the guest.
  3. Power on the FreeBSD guest.
  4. Assign USB drive to guest OS.

    Open the virtual system console, and right click the USB drive icon.

    Click to select your USB drive.

    Note that this is a 1-time assignment only. Please see instructions at the end of the section on how to automatically assign this particular USB drive for all subsequent sessions.
  5. Login to FreeBSD, and mount the drive.
    You can mount a MS-DOS based flash drive by running the following commands as root. Replace /dev/da0s1 with the proper device identifier for your USB drive. (You can find out the exact device ID by first running dmesg to identify the device name, e.g. da0, and fdisk to reveal the disk partition structure, e.g., s1.)
     # mkdir -p  /media/usb
     # mount -t msdosfs  /dev/da0s1  /media/usb
    
    To unmount the drive,
     # umount /media/usb
    
To always automatically assign a particular USB drive to the guest OS, open the VirtualBox Manager, click Settings, and then USB.

Finally, click Add USB device filter (with the + sign) icon, and select the USB drive that is currently inserted in the host.

Related posts

Tuesday, January 16, 2018

What to do after installing VirtualBox

This post is part 2 of the 4-part series on creating a virtual machine using VirtualBox hosted on a Debian machine. Part 1 focuses on the installation of VirtualBox and the guest OS (FreeBSD). Part 2 addresses things that you should do after installing VirtualBox. Lastly, parts 3 and 4 deals specifically with accessing USB flash drives from the guest OS, and sharing folders.

Install extension pack

The base VirtualBox package is missing some important functionalities: support for virtual USB 2.0 and 3.0 devices, host webcam passthrough, Intel PXE boot, and disk image encryption. To obtain those functionalities, you need to download and install the VirtualBox extension pack.
Note that the extension pack operates under a much stricter license than the GPLv2 of the base VirtualBox package. Specifically, the VirtualBox Extension Pack Personal Use and Evaluation License (PUEL) 'is a free license for personal, educational or evaluation use'. For commercial use, you do have to pay a fee to Oracle.
The procedure to install the extension pack is as follows:
  1. Download the VirtualBox extension pack to your host machine.

    The extension pack is available from the VirtualBox website. The package is universal for all host and guest OSes. However, you should use the same version for both the base and extension pack. In other words, when you upgrade your base, you should also upgrade the extension pack.
  2. Run VirtualBox Manager.
  1. Add extension pack.

    From the File menu, click Preferences. Then, select Extensions in the side panel.

Click the + icon to specify the location of the extension pack file (Oracle_VM_VirtualBox_Extension_Pack-5.2.4-119785.vbox-extpack).


At the end, click Install. Before it begins installation, you will be prompted to accept the software license, and to enter the administrative password.

Bridge host & guest networks

By default, the virtual machine is NATed (not bridged) to your host network. Consequently, the FreeBSD guest is on a different subnet than the host. For example, my FreeBSD guest has a 10.0.0.2 IP address while my Linux host has a 192.168.1.49 IP address. Practically, it means that I cannot ssh to the guest OS from anywhere in my host network. To make that possible, I need to bridge the host network and the guest. The procedure is below (the VM does not have to be powered off for you to change networking).
  1. Open the VirtualBox Manager, and click Settings.
  2. Click Network in the side menu.
  1. Select Bridged Adapter in the Attached to dropdown menu.

Enable copy & paste between host & guest

I administer the FreeBSD guest extensively from its virtual system console running on the Linux host. By default, the clipboard is not shared between the host and the guest systems. That means I often need to manually re-enter commands on the guest OS rather than copy and paste from the host. To share the system clipboard (and save yourself plenty of laborious typing), follow the steps below:
  1. Open the VirtualBox Manager, and click Settings.
  2. Select General, and click the Advanced tab.
  1. Select bidirectional for both Shared Clipboard and Drag and Drop.
Note that, to share the clipboard, the FreeBSD-specific guest additions package (emulators/virtualbox-ose-additions) must also be installed. The instruction for that is already detailed in the Post-installation section of part 1 of this series.

Related posts

Tuesday, January 2, 2018

axi-cache: a new search tool for Debian packages


Debian has no shortage of tools when it comes to searching for packages. Revered oldtimers include apt-cache, apt, and apt-file. axi-cache is the new kid on the block. This post explains what is novel about axi-cache and how to use it.

First, axi-cache needs to be installed and initialized as follows:

# apt-get install apt-xapian-index
# update-apt-xapian-index
The index /var/lib/apt-xapian-index is up to date

The basic axi-cache search is syntactically very similar with the aforementioned search commands:

$ axi-cache search browser
930 results found.
Results 1-20:
100% chromium-driver - web browser - WebDriver support
99% chromium - web browser
99% ruby-browser - browser detection for Ruby
97% libwwwbrowser-perl - Platform independent means to start a WWW browser
96% libhtml-display-perl - module for displaying HTML locally in a browser
96% gcu-plugin - GNOME chemistry utils (browser plugin)
96% python-zope.browser - Shared Zope Toolkit browser components
96% python3-zope.browser - Shared Zope Toolkit browser components
96% chromedriver - web browser - WebDriver support transitional package
96% mythbrowser - Small web browser module for MythTV
96% chromium-widevine - web browser - widevine content decryption support
96% swfdec-mozilla - dummy package for transition to browser-plugin-gnash
95% python-livereload - automatic browser refresher
95% mozilla-plugin-gnash - dummy package for renaming to browser-plugin-gnash
95% python3-livereload - automatic browser refresher (Python 3)
95% qupzilla - lightweight web browser based on libqtwebkit
95% python-livereload-doc - automatic browser refresher (documentation)
95% firefox-esr - Mozilla Firefox web browser - Extended Support Release (ESR)
95% ipig - integrating PSMs into genome browser visualisations
94% epiphany-browser-data - Data files for the GNOME web browser
More terms: refresher livereload safer stable refresh browsing webdriver
More tags: field::religion culture::dutch uitoolkit::gtk field::chemistry use::browsing web::browser interface::x11
`axi-cache more' will give more results

A similar search using apt-cache returns 962 results with the top 20 results being:

389-admin - 389 Directory Administration Server
libds-admin-serv0 - Libraries for the 389 Directory Administration Server
xul-ext-adblock-plus - advertisement blocking extension for web browsers
ajaxterm - Web based terminal written in Python
alevt - X11 Teletext/Videotext browser
alice - Web browser (WebKit or Gecko) based IRC client
xul-ext-all-in-one-sidebar - sidebar extension for Firefox
node-almond - minimal AMD API implementation for use in optimized browser builds
pilot - Simple file browser from Alpine, a text-based email client
ams - Realtime modular synthesizer for ALSA
amule-gnome-support - ed2k links handling support for GNOME web browsers
libjs-angularjs - lets you write client-side web applications as if you had a smarter browser
libjs-animate.css - cross-browser library of CSS animations
libapache2-mod-upload-progress - upload progress support for the Apache web server
apachedex - Compute APDEX from Apache-style logs
xfonts-kapl - APL fonts for A+ development
artemis - genome browser and annotation tool
libjs-asciimathml - Library to render high quality mathematical formulas in a browser
aspectj - aspect-oriented extension for Java - tools
auctex - integrated document editing environment for TeX etc.

Note that, unlike apt-cache, axi-cache returns, by default, only the top 20 hits. You can see the entire result set by specifying the --all option (e.g., axi-cache --all search browser). Alternatively, you can page through the results by running the following command after the initial search.

$ axi-cache more

In general, axi-cache returns more relevant results than apt-cache. The latter implements a rudimentary grep-like search by matching regular-expression text patterns against the package name and description of a package. Unless you have some idea of the package's name, an apt-cache search often returns many irrelevant results, as indicated by the above example. In contrast, axi-cache can rank the search results by relevance with the help of the Apt Xapian Index(axi). This index is a database of package meta-data which includes much more than just a package's name and description. To examine what is indexed, run the following command:

$ axi-cache info
...<snipped>...
Plugin status:
aliases enabled, up to date (430 days, 15:47:18.356149 older than index)
app-install disabled
apttags enabled, needs indexing (6 days, 23:59:10.729973 newer than index)
cataloged_time enabled, needs indexing (6 days, 23:59:10.729973 newer than index)
debtags disabled
descriptions enabled, needs indexing (6 days, 23:59:10.729973 newer than index)
relations enabled, needs indexing (6 days, 23:59:10.729973 newer than index)
sections enabled, needs indexing (6 days, 23:59:10.729973 newer than index)
sizes enabled, needs indexing (6 days, 23:59:10.729973 newer than index)
template enabled, up to date
translated-desc enabled, needs indexing (1 day, 10:56:58.643851 newer than index)
...<snipped>...

As an aside, you can update the Apt Xapian Index by executing the following command as root:

# update-apt-xapian-index

The most distinctive feature of the index is its use of tags (apttags). These tags categorize a package by predefined facets such as role, protocol, suite, culture, use, works-with, etc.

Suppose you are multi-lingual and you are looking for packages that install, say, Chinese fonts. You can quickly identify the packages you need using the following command.

$ axi-cache search x11::font and culture::chinese and role::data
13 results found.
Results 1-13:
100% fonts-arphic-bkai00mp - "AR PL KaitiM Big5" Chinese TrueType font by Arphic Technology
100% fonts-arphic-bsmi00lp - "AR PL Mingti2L Big5" Chinese TrueType font by Arphic Technology
100% fonts-arphic-gbsn00lp - "AR PL SungtiL GB" Chinese TrueType font by Arphic Technology
100% fonts-arphic-gkai00mp - "AR PL KaitiM GB" Chinese TrueType font by Arphic Technology
100% fonts-cwtex-fs - TrueType Font from cwTeX - FangSong
100% fonts-cwtex-heib - TrueType Font from cwTeX - HeiBold
100% fonts-cwtex-kai - TrueType Font from cwTeX - Kai
100% fonts-cwtex-ming - TrueType Font from cwTeX - Ming
100% fonts-cwtex-yen - TrueType Font from cwTeX - Yen
100% ttf-wqy-zenhei - transitional dummy package
100% xfonts-intl-chinese - international fonts for X - Chinese
100% xfonts-intl-chinese-big - international fonts for X - large Chinese
100% xfonts-unifont - PCF (bitmap) version of GNU Unifont
More terms: chinese fonts truetype cwtex font koanughi cwttf
More tags: made-of::font culture::taiwanese role::dummy role::app-data culture::greek culture::korean culture::russian

Note that axi-cache supports logical operations such as AND, OR, and NOT.

The following table compiles a non-exhaustive list of common facets and example values. For a complete list, please click here. To make a tag, join the facet and the value using 2 colons, e.g., role::program.

Facet Values
admin filesystem, forensics, monitoring, power-management, virtualization
culture chinese, latvian, russian
field arts, astronomy, finance, mathematics, medicine, statistics
game arcade, board, card, fps, mud, puzzle, rpg, sport, toys, typing
implemented-in c, php
interface 3d, commandline, graphical, shell, x11
network client, configuration, server, service, vpn
office finance, groupware, presentation, spreadsheet
protocol ip, ipv6, smtp, webdav
role app-data, data, debug-symbols, devel-lib, documentation, kernel, metapackage, plugin, program, shared-lib, source
security antivirus, authentication, cryptography, log-analyzer
suite bsd, debian, eclipse, emacs, gnome, gnu, kde, mozilla, mysql, openoffice, openstack, postgresql, xfce, xmms2
system cloud, embedded, laptop, mobile, server, virtual
uitoolkit gtk, motif, ncurses, qt, sdl, tk, xlib
use analysing, browsing, calculating, chatting, checking, compressing, configuring, converting, downloading, driver, editing, entertaining, filtering, gameplaying, learning, login, measuring, monitor, organizing, playing, printing, routing, scanning, searching, simulating, storing, synchronizing, transmission, typesetting, viewing
works-with archive, audio, calendar, db, file, font, image, logfile, mail, network-traffic, spreadsheet, text, unicode, video
x11 font, screensaver, theme, window-manager

In closing, axi-cache is a good search tool for Debian packages because it usually gives you more relevant results. One caveat is warranted, however. Not all Debian packages have tags defined, which is particularly true for packages that are downloaded from third-party non-standard repositories.