The scenario

I had an existing WordPress website, say example1.com, that was hosted on a DigitalOcean VPS running LEMP(Linux, NGINX, MySQL, PHP). The website supported HTTPS using a TLS certificate issued by Let's Encrypt.
I wanted to start a new WordPress website, say example2.com. Barring a miracle, example2.com would initially have minimal traffic.
I decided that the new site would run on a virtual host on the same VPS, using WordPress's multisite feature.
WordPress multisite

The multisite model in WordPress can be summarized as '1 instance, 1 database'. The multiple websites share the same WordPress DocumentRoot directory (/var/www/example1) and the same WordPress mySQL database.
Within the single database, site-specific information is stored in tables identified by the blog IDs. For instance, the wp_posts table for example1.com retains the same name in multisite. However, the corresponding table for example2.com is named wp_2_posts (the 2 in the name refers to the official blog ID).
Multisite introduces a new level of complexity in administration. Seeing multisite in action is the best way to know what you are getting into before actually migrating your production website.
Trialing the migration

Setting up a separate VPS with the same configuration as the production system is the best option for conducting a trial migration. Notwithstanding, I opted for a poor man's platform to test the migration, my home workstation.
I won't be able to completely replicate at home the production environment. Most notably, no HTTPS for the home machine because there won't be TLS certificates.
To reflect the change from HTTPS to HTTP, I modify 2 WordPress administrative options, siteurl and home. Run the following SQL commands under mySQL:
update wp_options set option_value='http://example1a.com' where option_name = 'siteurl';
update wp_options set option_value='http://example1a.com' where option_name = 'home';
Note that instead of reusing the same names for example1.com and example2.com, I renamed them to say example1a.com and example2a.com respectively. In addition, I configure local DNS on my home workstation to map example1a.com and example2a.com to localhost's IP address. The reason is that I can access both the production and the trial websites at the same time. Add the following lines to the /etc/hosts file:
127.0.1.1   example1a.com
127.0.1.1   example2a.com
The rest of this post will detail the steps to convert WordPress from hosting a single site to hosting multiple sites.
Configuring system

- Configure DNS.
Register example2.com with a domain name registry and add the appropriate DNS records.
- Obtain Let’s Encrypt TLS certificate for second domain.
I assume certbot is already installed, certbot.timer enabled, and port 443 open.
Although it is possible to bundle multiple domains, example1.com and example2.com in a single certificate, it is recommended that you create separate certificates for unique domain names.
$ sudo certbot certonly --webroot -n --agree-tos -m sysadmin@example2.com -w /var/www/example1.com -d example2.com
-m: the email address for the certificate contact.
-w: the DocumentRoot for example2.com which is the same as example1.com.
-d: the domain.
- Install certificate.
Link the private key and the certificate generated by Let’s Encrypt to their respective expected TLS locations.
$ sudo ln -s /etc/letsencrypt/live/example2.com/privkey.pem /etc/ssl/private/key2.pem
$ sudo ln -s /etc/letsencrypt/live/example2.com/fullchain.pem /etc/ssl/certs/cert2.pem
Note that the names key2.pem and cert2.pem must be different from their counterparts for example1.com. Make a note of their names as you will need them later.
- Configure website.
Create /etc/nginx/sites-available/example2.com.conf by copying example1.com.conf and making the necessary changes.
My skeleton example2.com.conf file looks like the following. The highlighted lines are relevant to the migration per se.
server { listen 80; return 301 https://$host$request_uri; } server { listen 443 ssl; ssl_certificate /etc/ssl/certs/cert2.pem; ssl_certificate_key /etc/ssl/private/key2.pem; root /var/www/example1.com; server_name example2.com *.example2.com; index index.html index.php; location / { try_files $uri $uri/ /index.php?q=$uri&$args; } location ~ \.php$ { fastcgi_pass unix:/var/run/php/php7.3-fpm_example1.com.sock; } location ~* /(?:uploads|files)/.*\.php$ { deny all; } location = /robots.txt { allow all; log_not_found off; access_log off; } add_header X-XSS-Protection "1; mode=block"; add_header X-Content-Type-Options nosniff; add_header X-Robots-Tag none; add_header X-Download-Options noopen; add_header X-Permitted-Cross-Domain-Policies none; add_header Strict-Transport-Security "max-age=15768000; includeSubDomains; preload"; add_header Referrer-Policy no-referrer; add_header X-Frame-Options "SAMEORIGIN"; } - The location of the certificate (cert2.pem) and key (key2.pem) need to be specified.
- The DocumentRoot location is the same as example1.com.
- The relevant server names are specified for this website(example2.com)
- PHP handling is listening to the same socket as example1.com (/var/run/php/php7.3-fpm_example1.com.sock).
- Enable website.
$ sudo ln -s /etc/nginx/sites-available/example2.com.conf /etc/nginx/sites-enabled/example2.com.conf - Reload NGINX.
Test the syntax of the file changes before actually reloading the configuration files.
$ sudo nginx -t
$ sudo systemctl reload nginx
Notes:
Configuring WordPress

- Install wp_cli.
Although one can handcraft the necessary lines in the WordPress configuration file (/var/www/example1.com/wp-config.php), I’d recommend using the command-line program [wp-cli](https://wp-cli.org/). To install, run this command sequence:
$ curl -O https://raw.githubusercontent.com/wp-cli/builds/gh-pages/phar/wp-cli.phar $ chmod +x wp-cli.phar $ sudo mv wp-cli.phar /usr/local/bin/wp - Convert to multisite.
$ wp core multisite-convert --subdomains --path=/var/www/example1.com
The above command can be run while the website is up because it only statically inserts the following lines into wp-config.php.
define( 'WP_ALLOW_MULTISITE', true ); define( 'MULTISITE', true ); define( 'SUBDOMAIN_INSTALL', true ); $base = '/'; define( 'DOMAIN_CURRENT_SITE', 'example1.com' ); define( 'PATH_CURRENT_SITE', '/' ); define( 'SITE_ID_CURRENT_SITE', 1 ); define( 'BLOG_ID_CURRENT_SITE', 1 ); - Patch ‘blocked cookie’ bug.
Unless the bug is patched, login to your new website (example2.com) is prevented. The error message from Firefox is ‘Cookies are blocked or not supported by your browser. You must enable cookies to use WordPress.’
To patch, edit /var/www/example1.com/wp-config.php, and insert the following define statement anywhere above the “That’s all” comment line.
define('COOKIE_DOMAIN', false); ... /* That's all, stop editing! Happy publishing. */ - Restart the PHP-FPM and NGINX daemons.
$ sudo systemctl restart php7.3-fpm
$ sudo systemctl restart nginx
Creating new site
- Login to the original WordPress website example1.com using the URL(https://example1.com/wp-login.php).
The ID to use to login is the same admin ID for example1.com. In multisite, this admin ID is promoted to super-admin status, capable of administering all domains within the network.
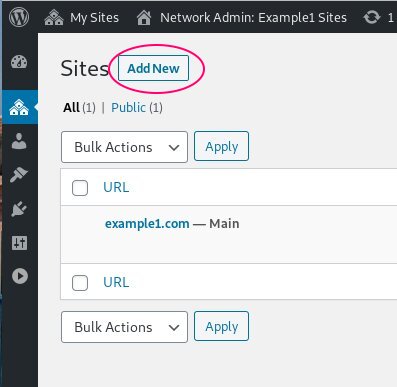
- Click My Sites and select Network Admin and then Sites.
- Click Add New.
- Enter the required data, and click Add Site.
- Again, click My Sites and select Network Admin and then Sites.
- Hover over example2.example1.com and click Edit.
- Enter the correct Site Address, https://example2.com/, and click Save Changes.


The Site Address is where one is supposed to enter the URL except it expects a subdomain, such as example2 which it will then concatenate with the primary domain to become example2.example1.com, not what I really wanted as in https://example2.com/. So for now, I simply play along by entering example2, and I will change it later. If you know a better way, please let me know in a comment.
The Admin Email can be that of an existing user, say the super-admin, or a new user.


Now, the new website is created and ready for you to edit. Browse to https://example2.com/wp-login.php and login as the super-admin user.
Related webpages
- Adding Google Analytics tracking code to a WordPress website
- Install latest WordPress on Debian Linux
1 comment:
thanks you so much
Post a Comment